328 Business e-Banking Demo - Maker
Fund Transfer
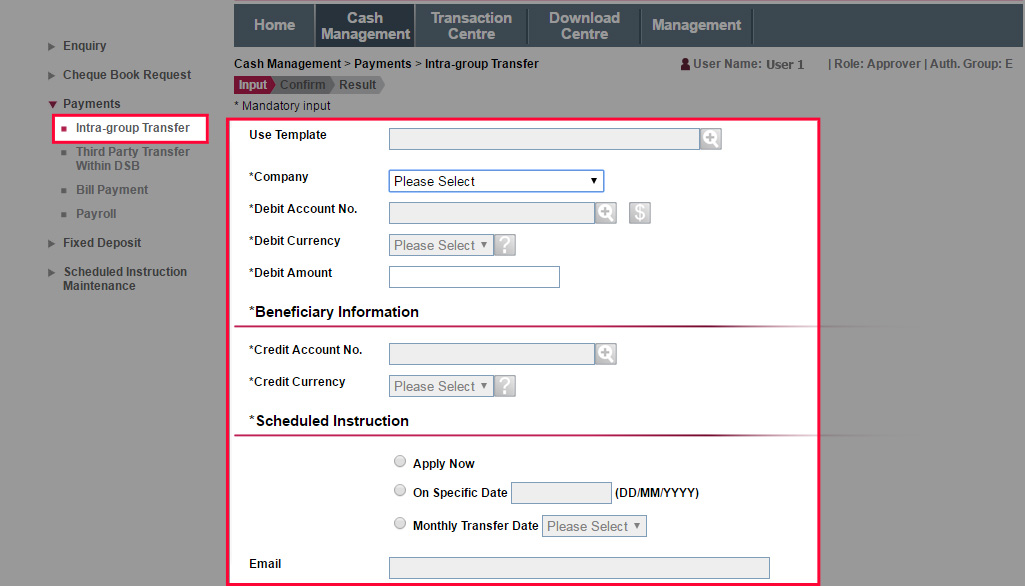
Enter the debit and credit accounts, amount and other information. You may set up instant, scheduled or monthly instruction. After entering all the details, click "Submit".
Fund Transfer
Enter the debit and credit accounts, amount and other information. You may set up instant, scheduled or monthly instruction. After entering all the details, click "Submit".
Fund Transfer
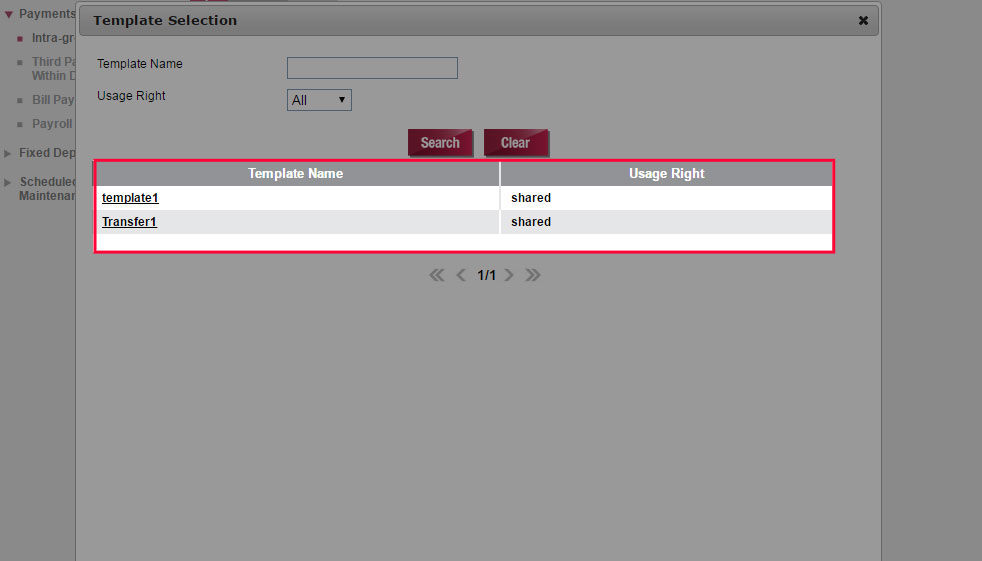
Or use templates to save your frequent instructions.
Fund Transfer
Or use templates to save your frequent instructions.
Fund Transfer
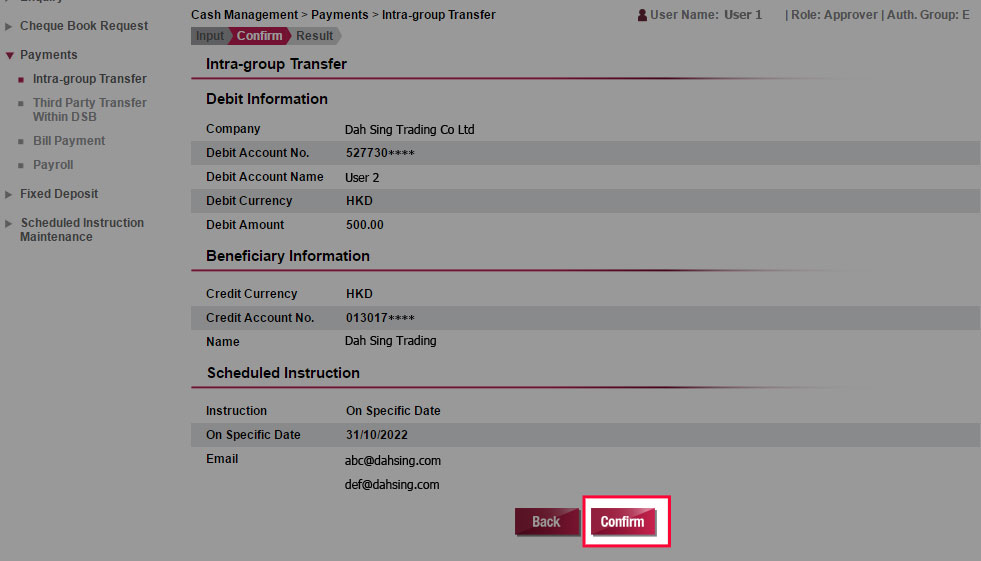
Verify the information and then submit the instruction by clicking "Confirm".
Fund Transfer
Verify the information and then submit the instruction by clicking "Confirm".
Fund Transfer
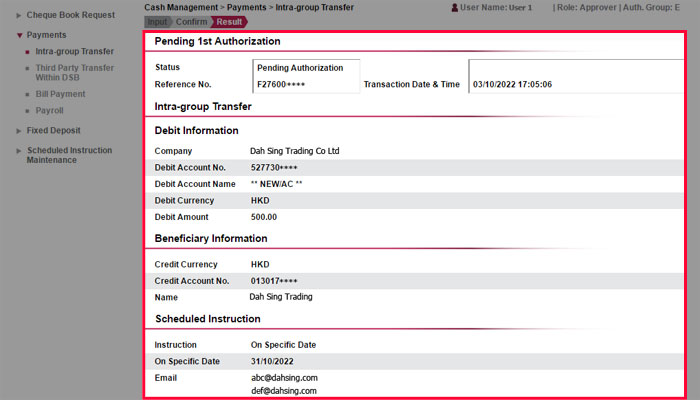
The instruction has been submitted successfully and will be processed upon final approval by the Approver.
Fund Transfer
The instruction has been submitted successfully and will be processed upon final approval by the Approver.
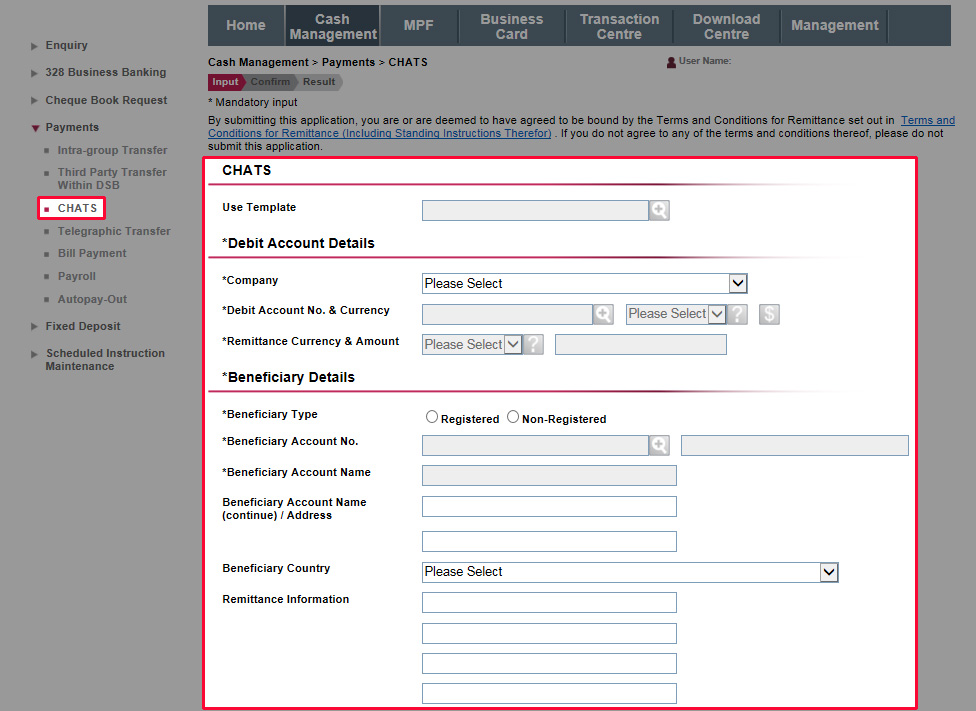
CHATS and Telegraphic Transfer
Enter the debit accounts and beneficiary account details, amount and other information. You may set up instant or scheduled instruction. After entering all the details, click "Submit".
CHATS and Telegraphic Transfer
Enter the debit accounts and beneficiary account details, amount and other information. You may set up instant or scheduled instruction. After entering all the details, click "Submit".
CHATS and Telegraphic Transfer
Or use templates to save your frequent instructions.

CHATS and Telegraphic Transfer
Or use templates to save your frequent instructions.
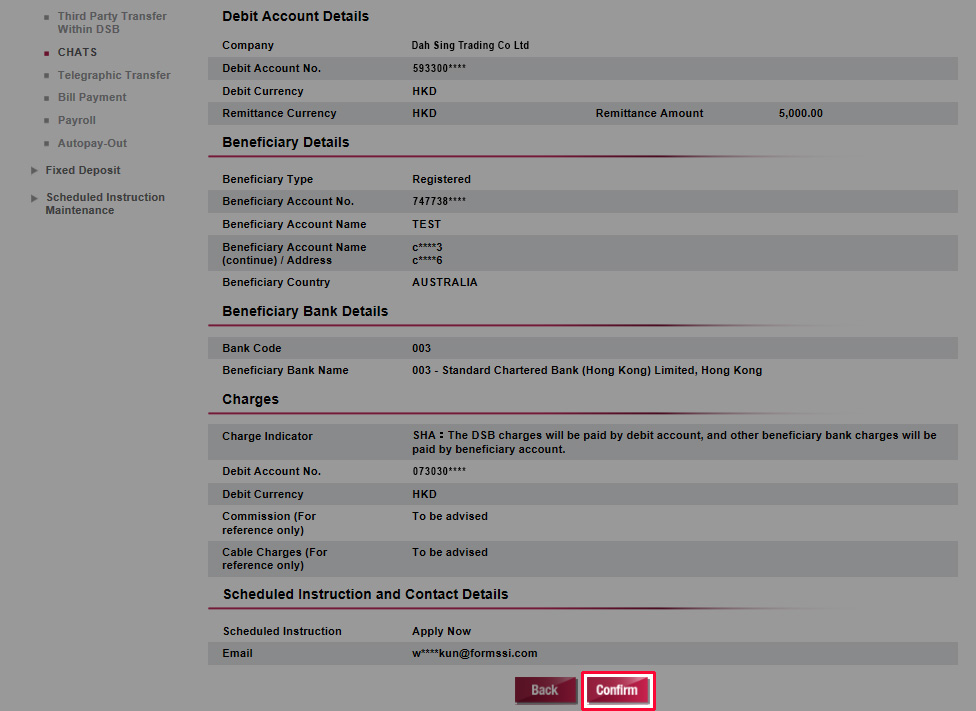
CHATS and Telegraphic Transfer
Verify the information and then submit the instruction by clicking "Confirm".
CHATS and Telegraphic Transfer
Verify the information and then submit the instruction by clicking "Confirm".
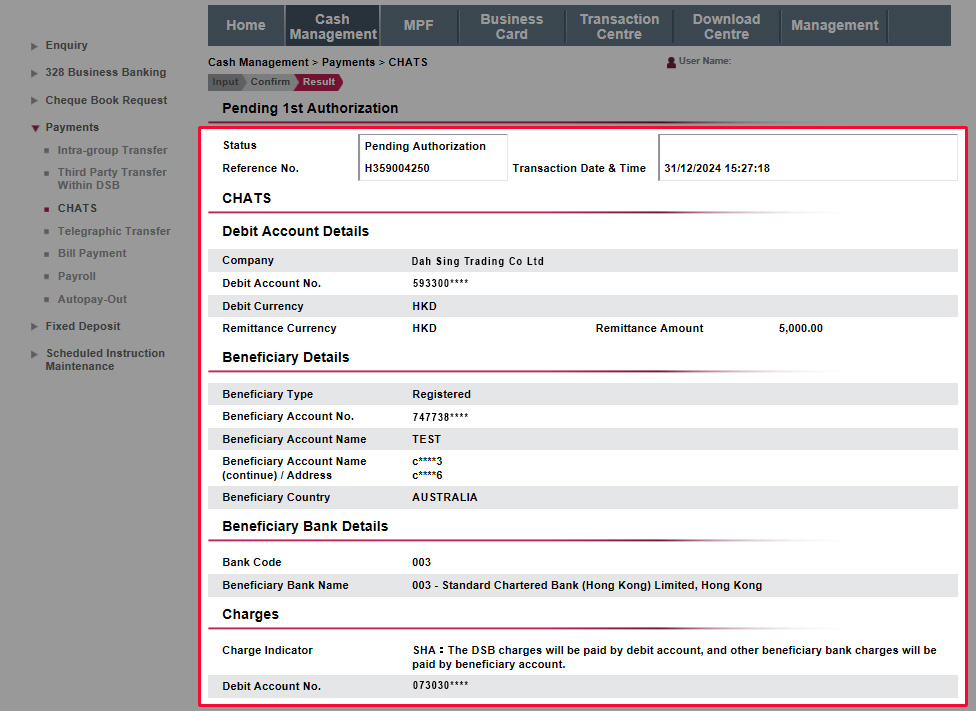
CHATS and Telegraphic Transfer
The instruction has been submitted successfully and will be processed upon final approval by the Approver.
CHATS and Telegraphic Transfer
The instruction has been submitted successfully and will be processed upon final approval by the Approver.
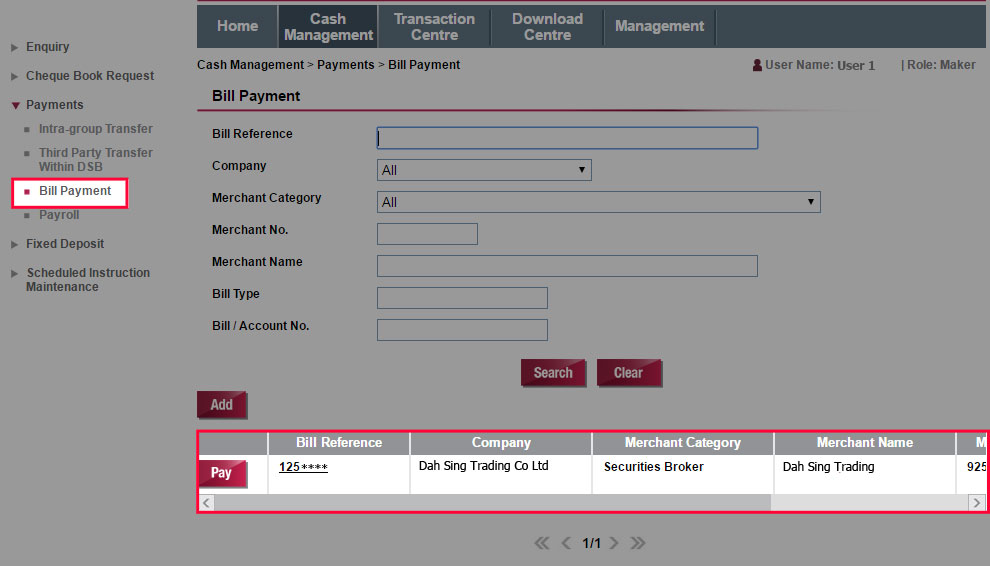
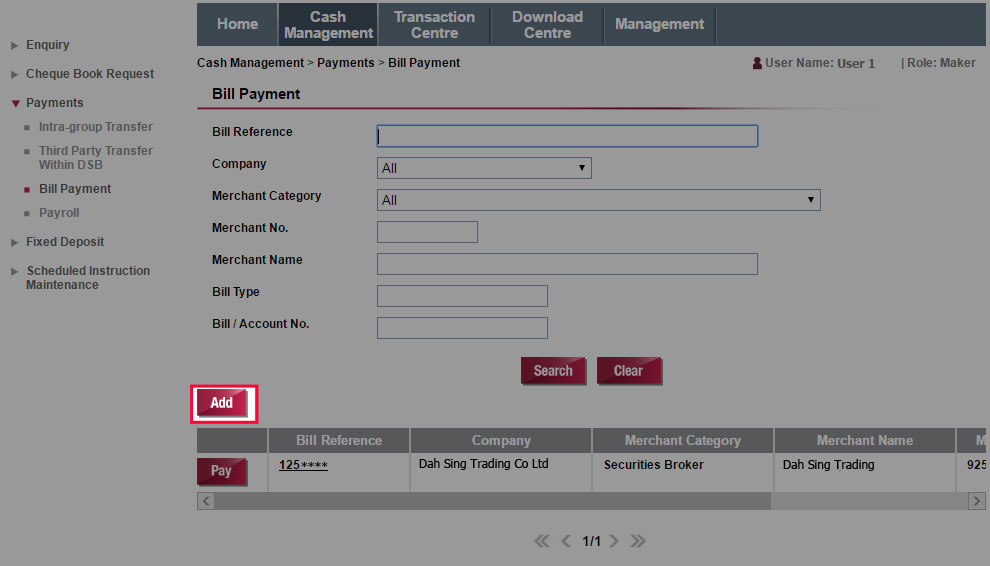
Bill Payment
Select "Bill Payment". Then select a bill to be paid and click "Pay".
Bill Payment
Select "Bill Payment". Then select a bill to be paid and click "Pay".
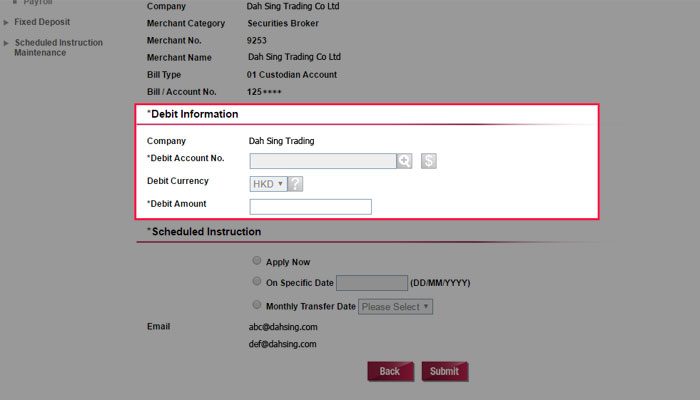
Bill Payment
Select a debit account, enter the payment date and amount. You may set up instant, scheduled or monthly instruction. After entering all the details, click "Submit" to proceed.
Bill Payment
Select a debit account, enter the payment date and amount. You may set up instant, scheduled or monthly instruction. After entering all the details, click "Submit" to proceed.
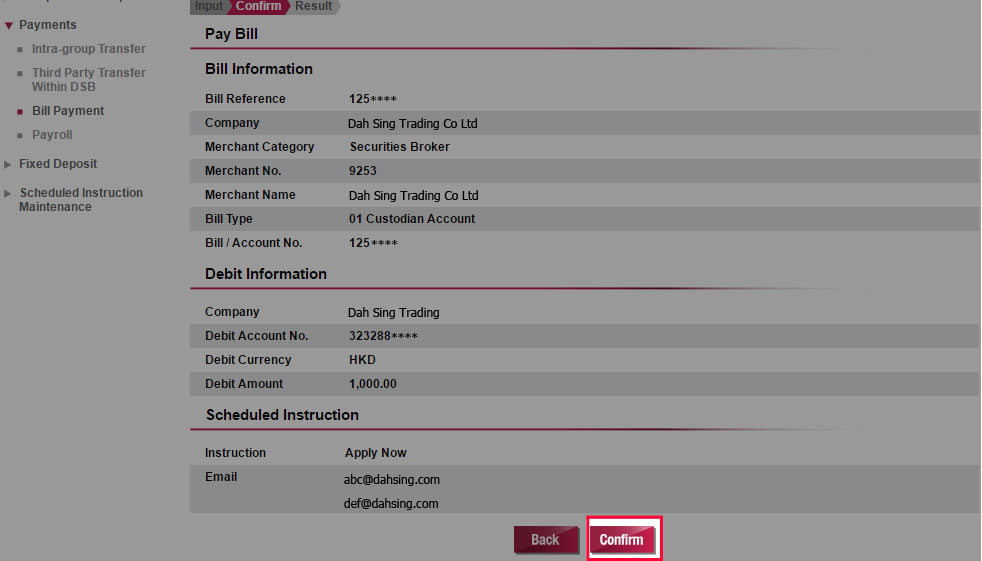
Bill Payment
Verify the information and then submit the instruction by clicking "Confirm".
Bill Payment
Verify the information and then submit the instruction by clicking "Confirm".
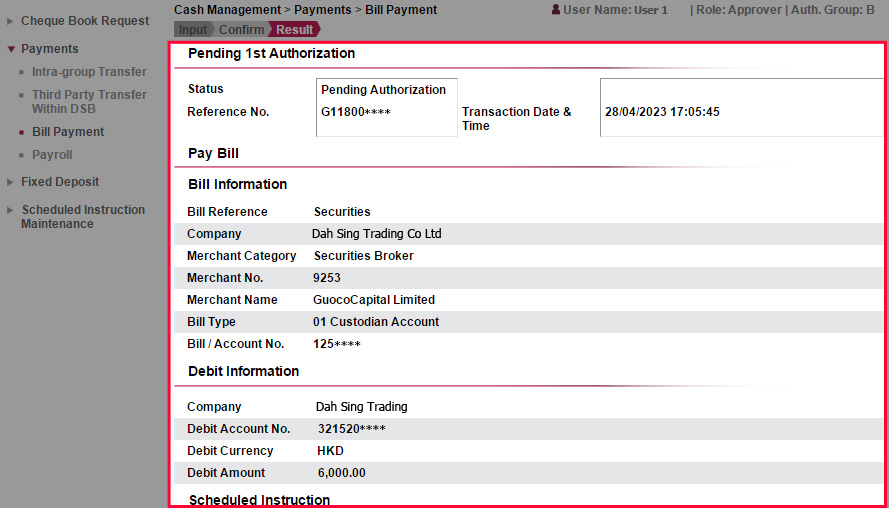
Bill Payment
The instruction has been submitted successfully and will be processed upon final approval by the Approver.
Bill Payment
The instruction has been submitted successfully and will be processed upon final approval by the Approver.
Bill Payment
You can also add new bill for payment by clicking "Add".
Bill Payment
You can also add new bill for payment by clicking "Add".
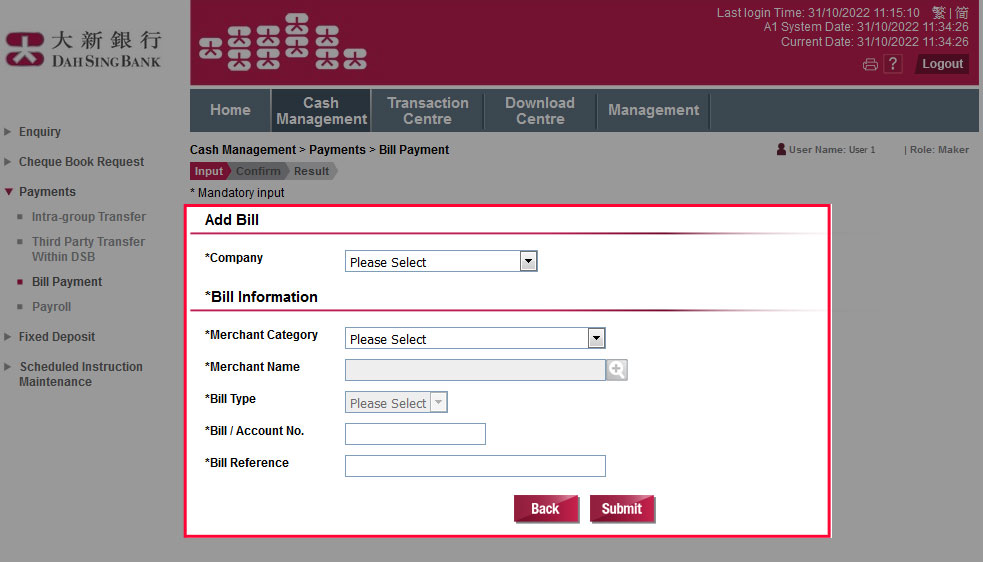
Bill Payment
Enter the company and bill information. After entering all the details, click "Submit". The bill will be successfully added upon completion.
Bill Payment
Enter the company and bill information. After entering all the details, click "Submit". The bill will be successfully added upon completion.
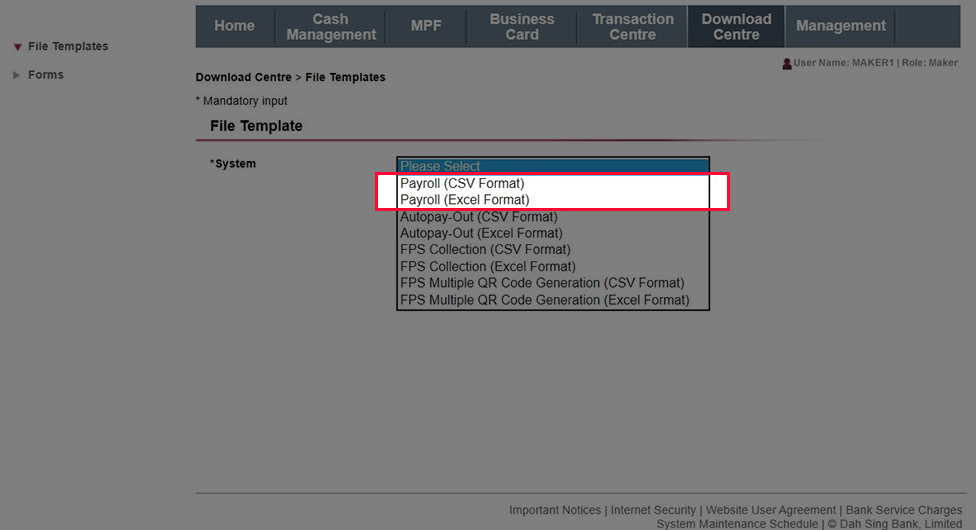
Payroll
Go to "Download Centre". Then select and save the Payroll file template.
Payroll
Go to "Download Centre". Then select and save the Payroll file template.
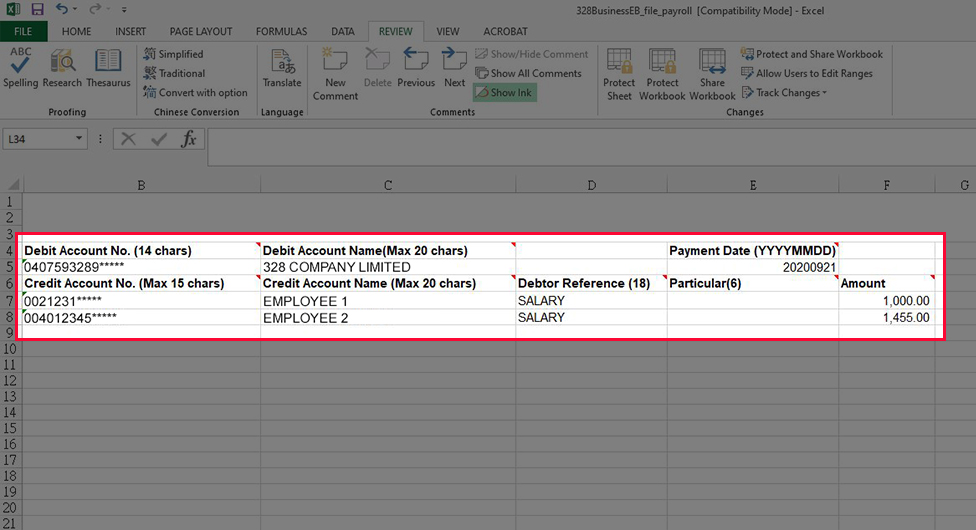
Payroll
Enter the payroll information in the file, verify and then save the file. If you download CSV file template, please open the file with Notepad for editing and save the file in CSV format for uploading. Note: Please add the Bank Code "040" to the beginning of the Originator Account number.
Payroll
Enter the payroll information in the file, verify and then save the file. If you download CSV file template, please open the file with Notepad for editing and save the file in CSV format for uploading. Note: Please add the Bank Code "040" to the beginning of the Originator Account number.
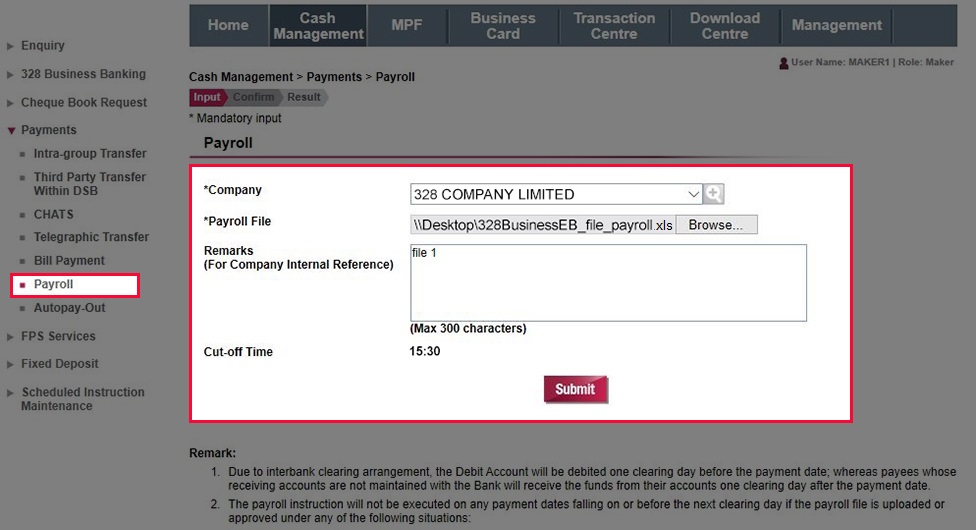
Payroll
Go to "Cash Management" > "Payment" > "Payroll". Select debit account details and upload the saved Payroll file, then click "Submit".
Payroll
Go to "Cash Management" > "Payment" > "Payroll". Select debit account details and upload the saved Payroll file, then click "Submit".
Payroll
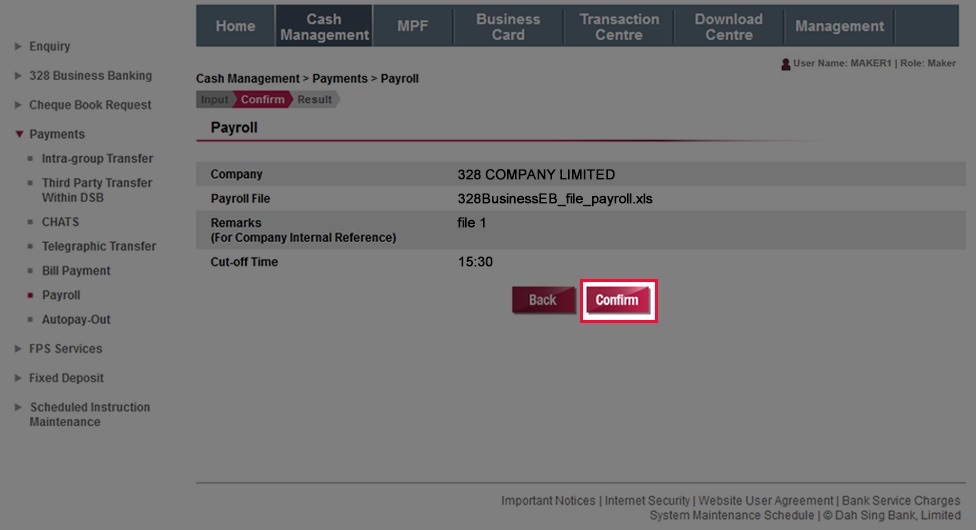
Verify the Payroll instruction and then submit the instruction by clicking "Confirm".
Payroll
Verify the Payroll instruction and then submit the instruction by clicking "Confirm".
Payroll
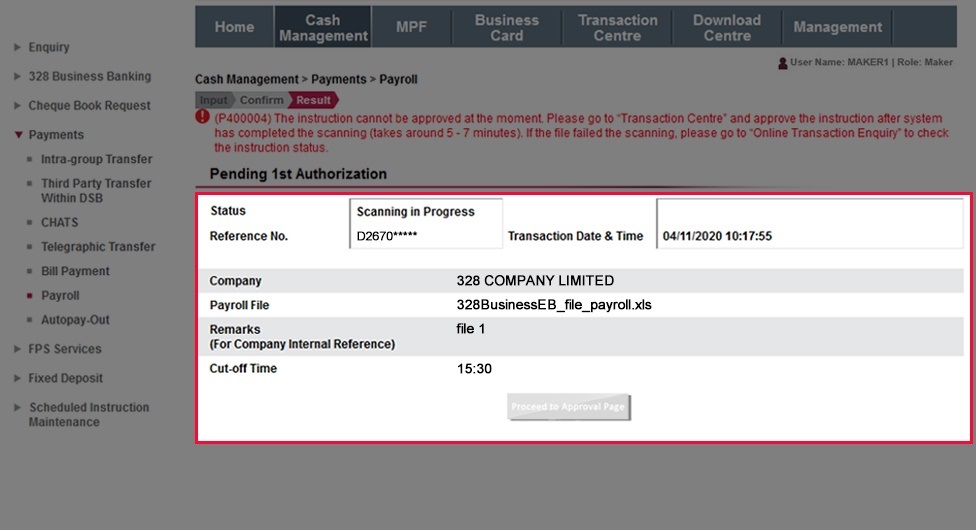
The instruction will be submitted after the file scanning is successfully completed and will be processed upon final approval by the Approver.
Payroll
The instruction will be submitted after the file scanning is successfully completed and will be processed upon final approval by the Approver.
Autopay-Out
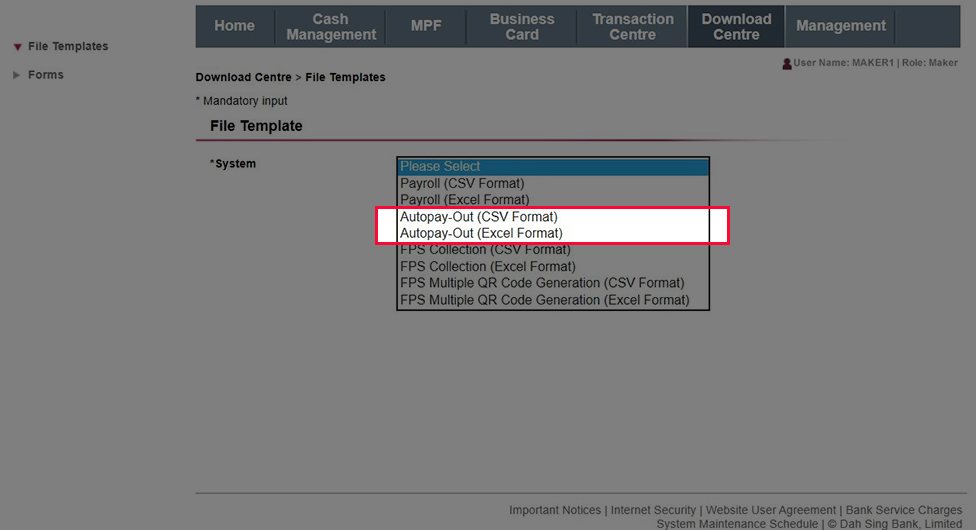
Go to "Download Centre". Then select and save the Autopay-Out template file.
Autopay-Out
Go to "Download Centre". Then select and save the Autopay-Out template file.
Autopay-Out
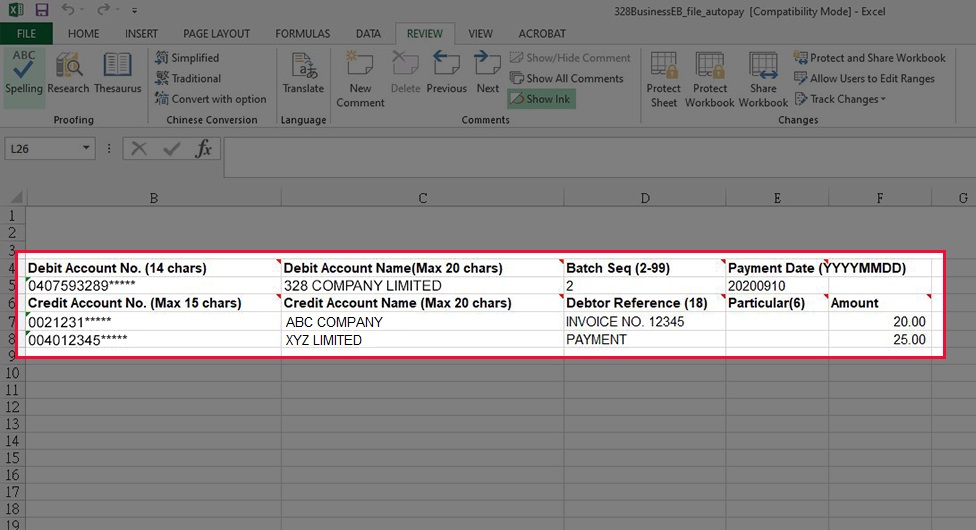
Enter the payment information in the file and then save the file. If you download CSV file template, please open the file with Notepad for editing and save the file in CSV format for uploading. Note: Please add the Bank Code "040" to the beginning of the Originator Account number.
Autopay-Out
Enter the payment information in the file and then save the file. If you download CSV file template, please open the file with Notepad for editing and save the file in CSV format for uploading. Note: Please add the Bank Code "040" to the beginning of the Originator Account number.
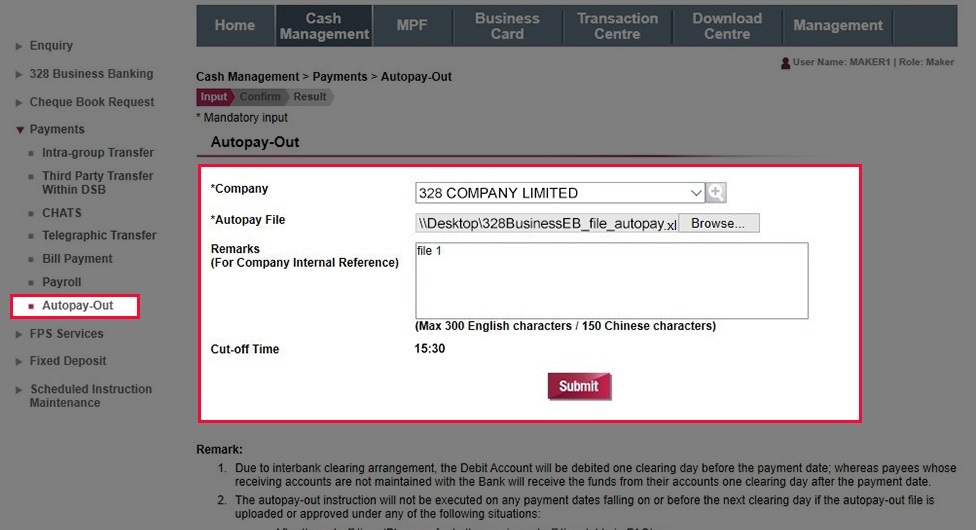
Autopay-Out
Go to "Cash Management" > "Payment" > "Autopay-Out". Select debit account details and upload the saved Autopay-Out file, then click "Submit".
Autopay-Out
Go to "Cash Management" > "Payment" > "Autopay-Out". Select debit account details and upload the saved Autopay-Out file, then click "Submit".
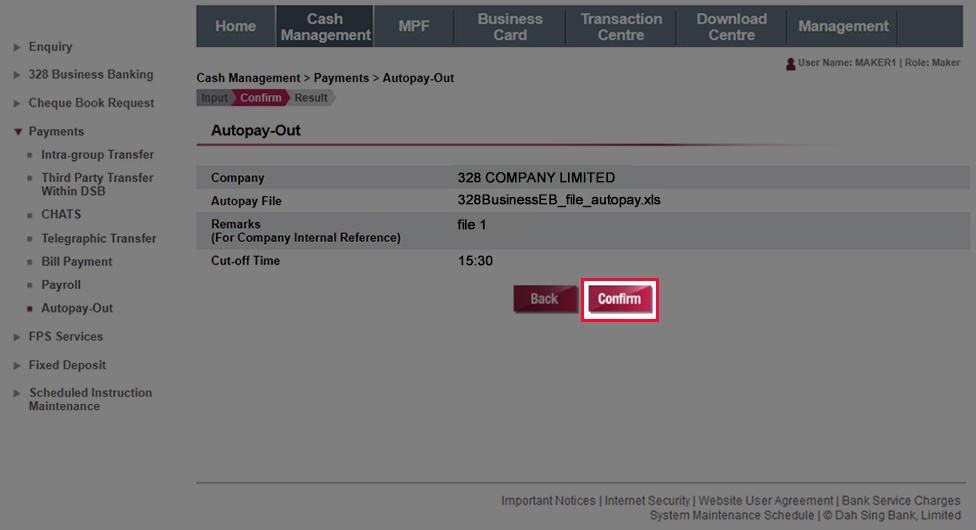
Autopay-Out
Verify the payment information and then submit the instruction by clicking "Confirm".
Autopay-Out
Verify the payment information and then submit the instruction by clicking "Confirm".
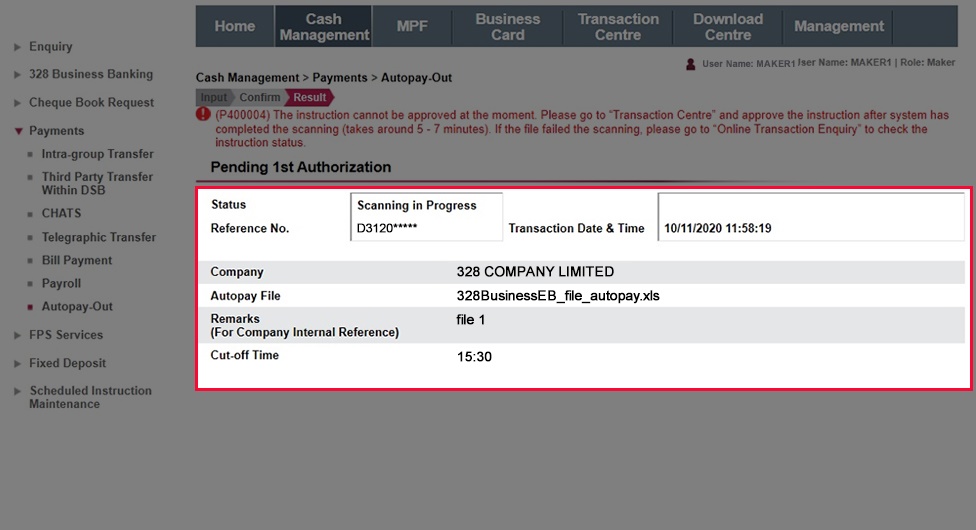
Autopay-Out
The instruction will be submitted after the file scanning is successfully completed and will be processed upon final approval by the Approver.
Autopay-Out
The instruction will be submitted after the file scanning is successfully completed and will be processed upon final approval by the Approver.
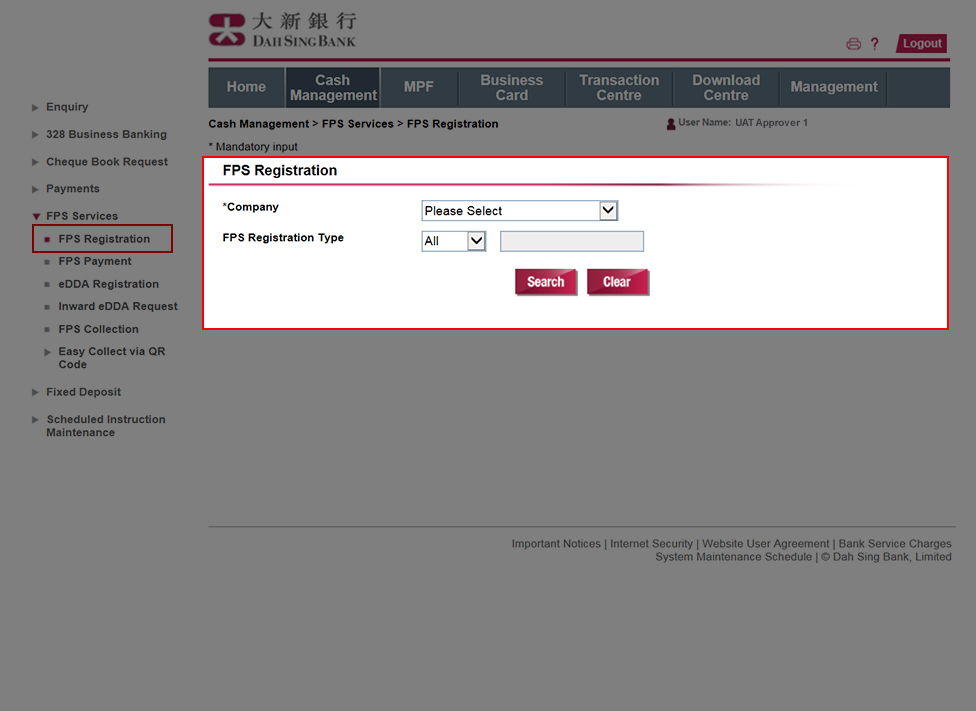
FPS Registration
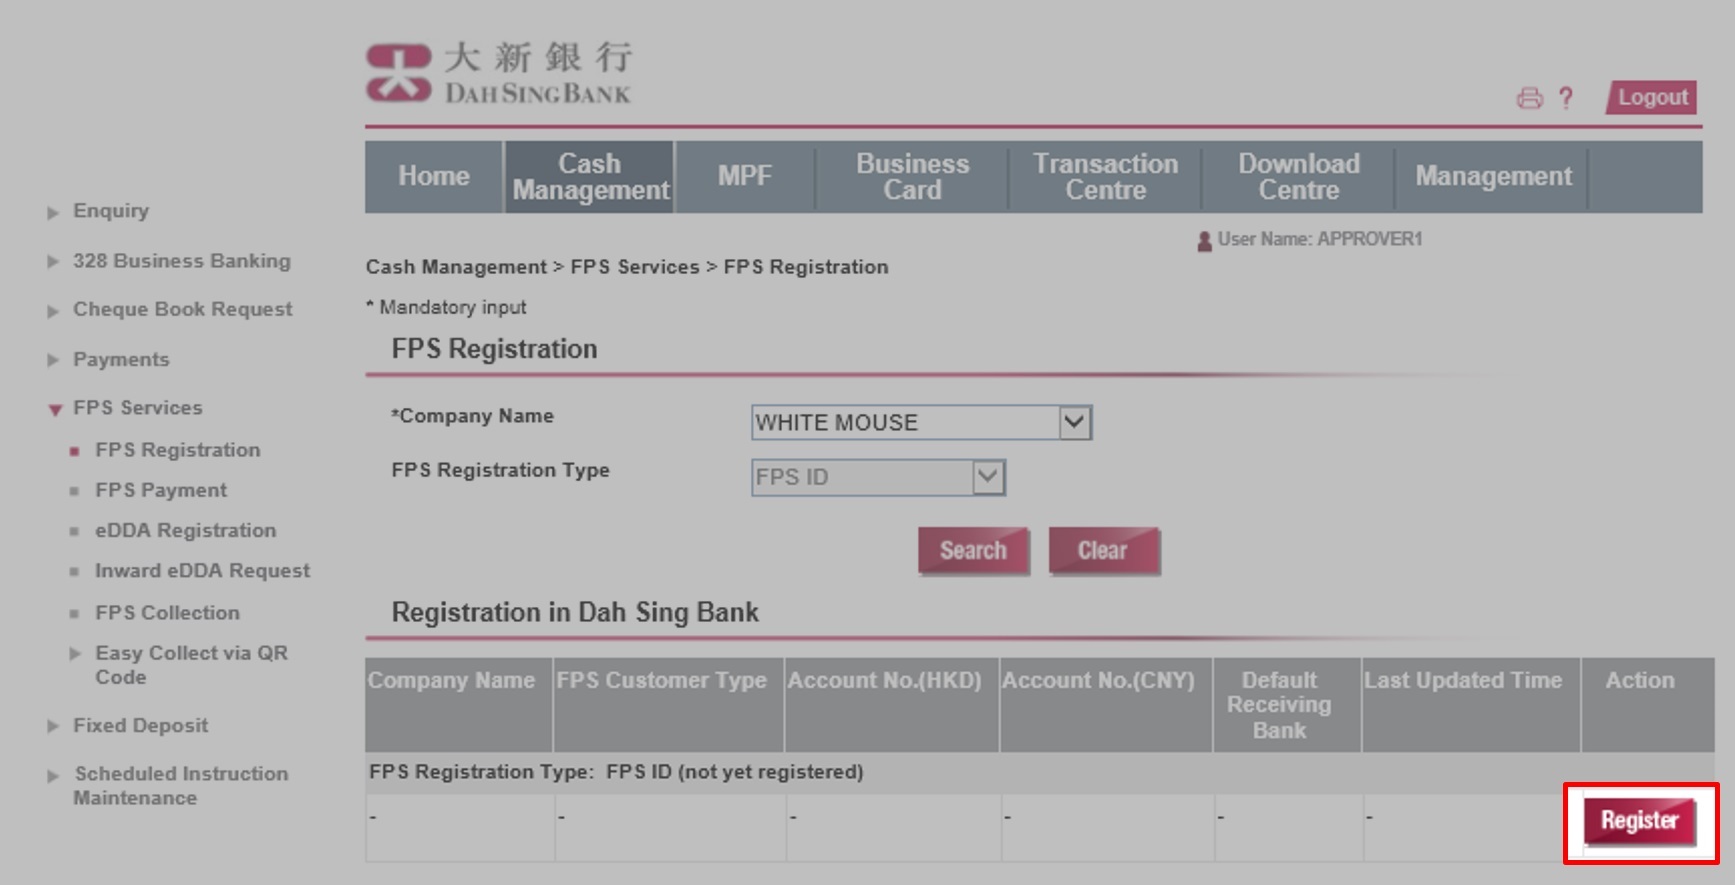
Go to "Cash Management" > "FPS Services" > "FPS Registration". Select a company to check the corresponding FPS registration records and / or register for FPS.
FPS Registration
Go to "Cash Management" > "FPS Services" > "FPS Registration". Select a company to check the corresponding FPS registration records and / or register for FPS.
FPS Registration
Click "Register" to proceed FPS ID registration.
FPS Registration
Click "Register" to proceed FPS ID registration.
FPS Registration
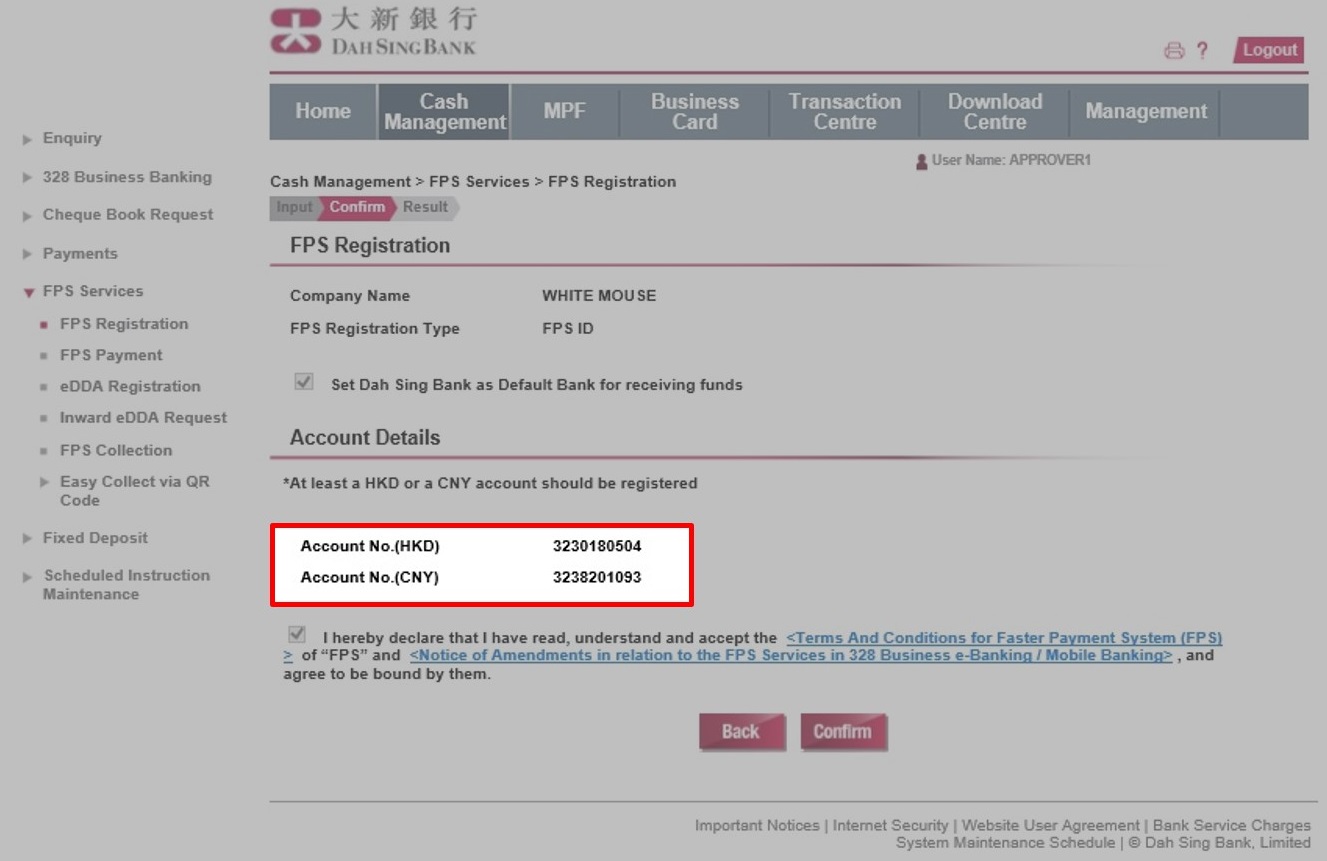
If you would like to register for an FPS ID:
1. Select at least one HKD or CNY account as the receiving funds account.
2. Read and accept the Terms and Conditions and click "Submit". Verify the information on the "Confirm" page and submit the instruction by clicking "Confirm".
FPS Registration
If you would like to register for an FPS ID:
1. Select at least one HKD or CNY account as the receiving funds account.
2. Read and accept the Terms and Conditions and click "Submit". Verify the information on the "Confirm" page and submit the instruction by clicking "Confirm".
FPS Registration
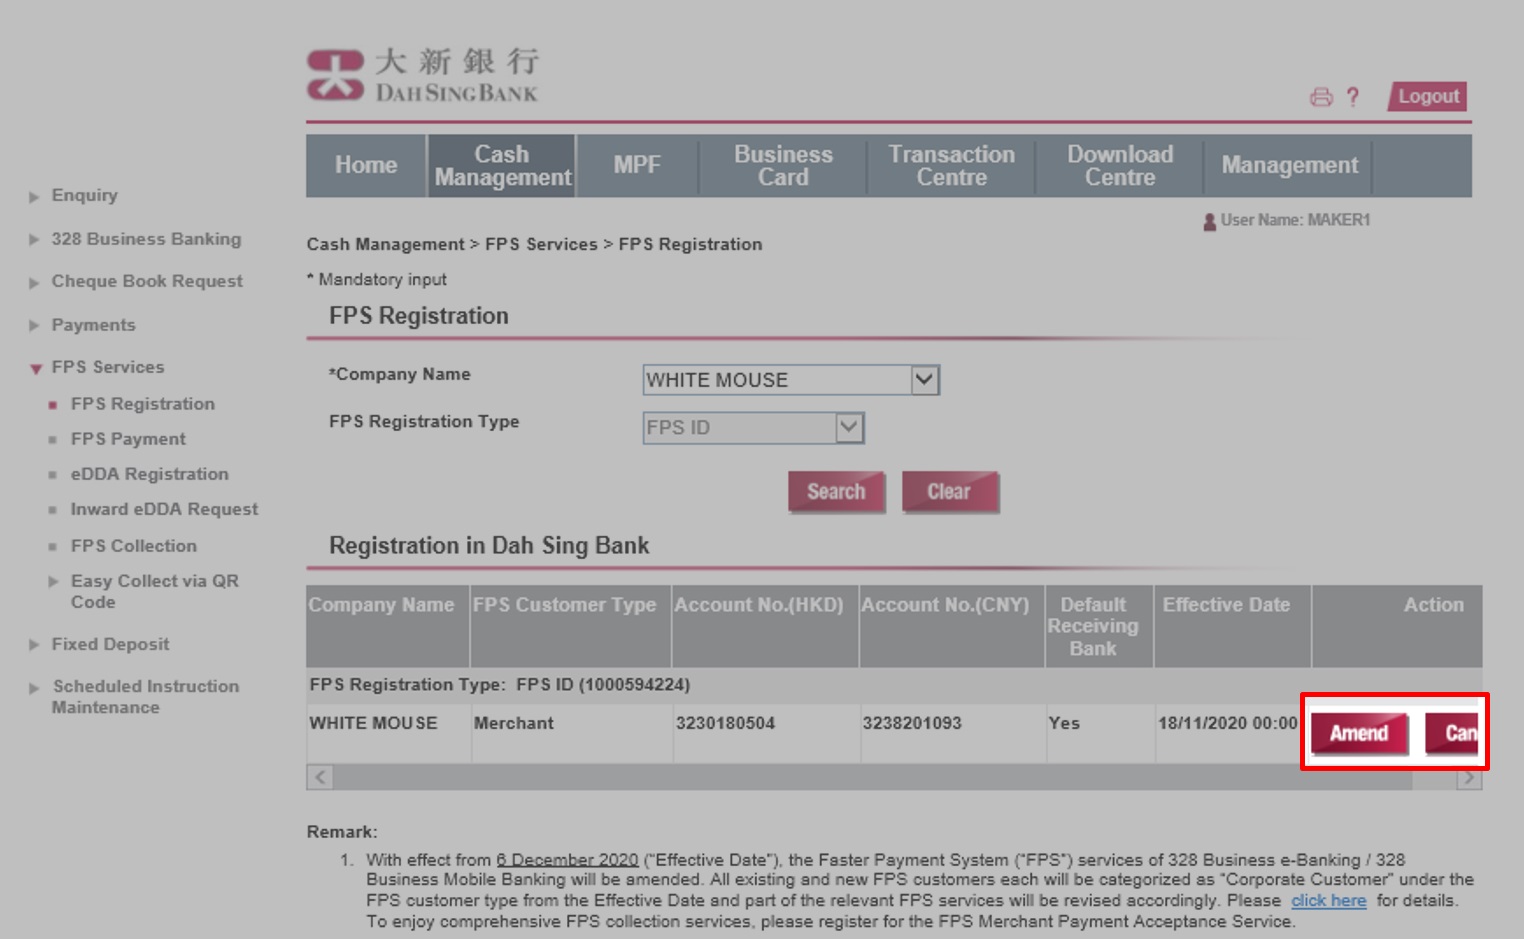
After the instruction has been approved, you can go to "Cash Management" > "FPS Services" > "FPS Registration" to your customer type, FPS registration records and status at our Bank. You can also click "Amend" or "Cancel" to amend or cancel an existing FPS registration.
FPS Registration
After the instruction has been approved, you can go to "Cash Management" > "FPS Services" > "FPS Registration" to your customer type, FPS registration records and status at our Bank. You can also click "Amend" or "Cancel" to amend or cancel an existing FPS registration.
FPS Payment
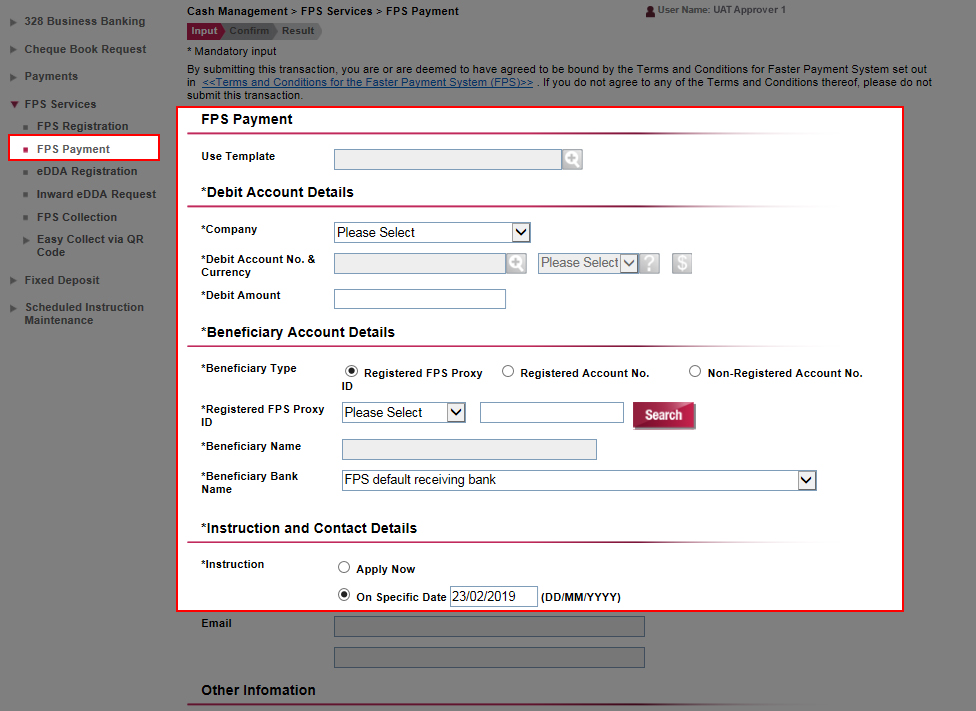
To submit an FPS fund transfer instruction, please go to "Cash Management" > "FPS Services" > "FPS Payment" and enter the debit account and beneficiary account details, amount and other information. After entering all the details, click "Submit".
FPS Payment
To submit an FPS fund transfer instruction, please go to "Cash Management" > "FPS Services" > "FPS Payment" and enter the debit account and beneficiary account details, amount and other information. After entering all the details, click "Submit".
FPS Payment
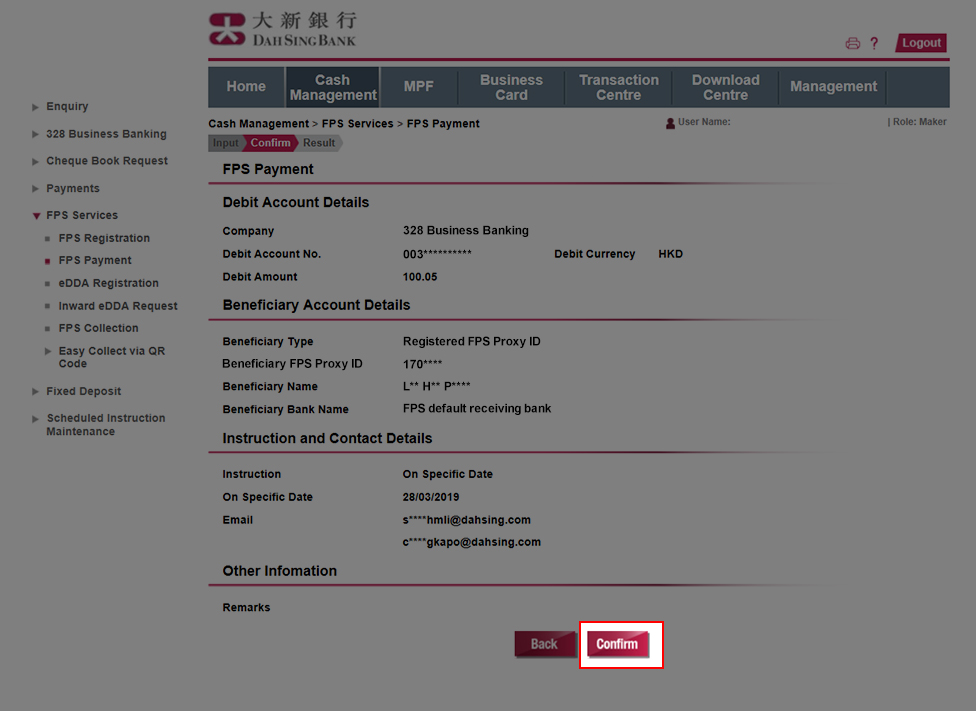
Verify the information and submit the instruction by clicking "Confirm".
FPS Payment
Verify the information and submit the instruction by clicking "Confirm".
FPS Payment
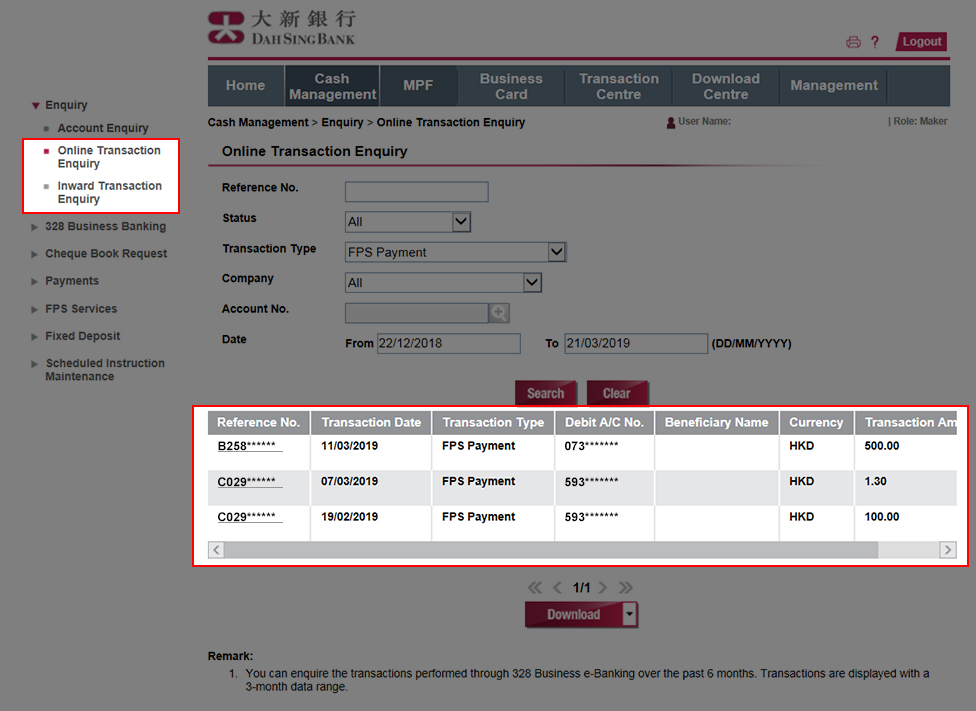
Check the details of the following fund transfer transactions: Inward FPS transaction: Go to "Cash Management" > "Enquiry" > "Inward Transaction Enquiry" > Select "Inward FPS transaction" Outward FPS payment: Go to "Cash Management" > "Enquiry" > "Online Transaction Enquiry"
FPS Payment
Check the details of the following fund transfer transactions: Inward FPS transaction: Go to "Cash Management" > "Enquiry" > "Inward Transaction Enquiry" > Select "Inward FPS transaction" Outward FPS payment: Go to "Cash Management" > "Enquiry" > "Online Transaction Enquiry"
eDDA Registration or Inward eDDA Request
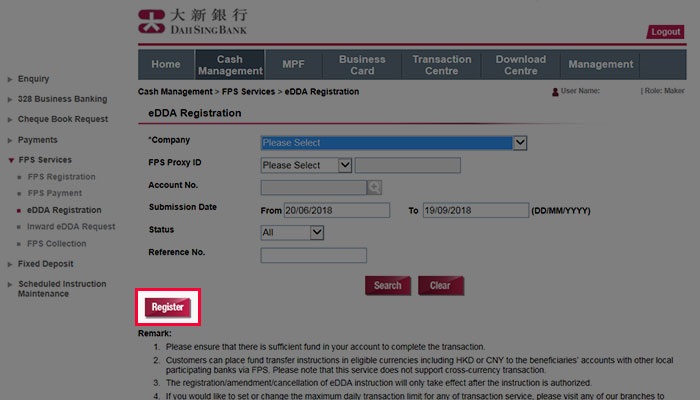
Select "Cash Management" > "FPS Service" > "eDDA Registration" and click "Register" to create an new eDDA instruction.
eDDA Registration or Inward eDDA Request
Select "Cash Management" > "FPS Service" > "eDDA Registration" and click "Register" to create an new eDDA instruction.
eDDA Registration or Inward eDDA Request
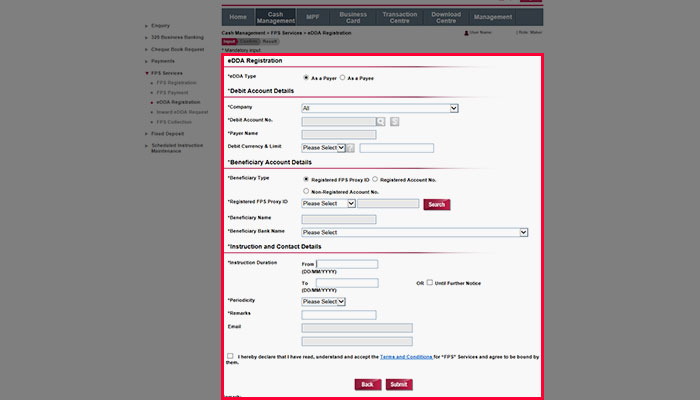
Enter the eDDA type, debit account and beneficiary account details, amount and instruction and contact details. After entering all the details, click "Submit".
eDDA Registration or Inward eDDA Request
Enter the eDDA type, debit account and beneficiary account details, amount and instruction and contact details. After entering all the details, click "Submit".
eDDA Registration or Inward eDDA Request
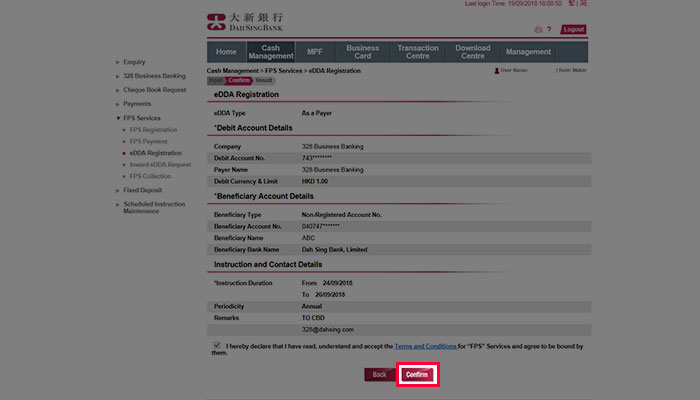
Verify the information and then submit the instruction by clicking "Confirm". Please note that the eDDA instruction will only take effect after the instruction is authorized by other side.
eDDA Registration or Inward eDDA Request
Verify the information and then submit the instruction by clicking "Confirm". Please note that the eDDA instruction will only take effect after the instruction is authorized by other side.
eDDA Registration or Inward eDDA Request
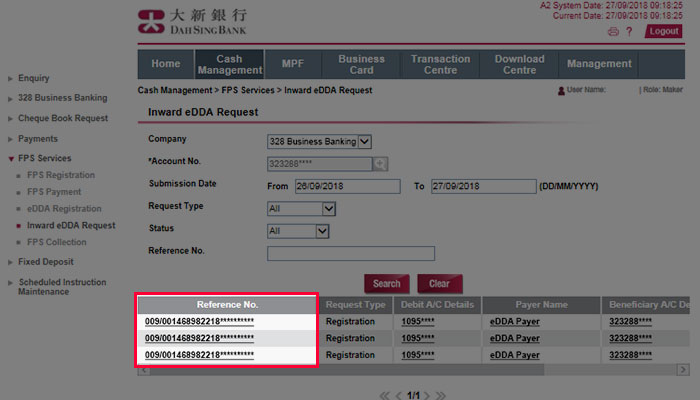
Check the detail for the eDDA instruction (Inward eDDA instruction). Go to "Cash Management" > "FPS Service" > "Inward eDDA Request".
eDDA Registration or Inward eDDA Request
Check the detail for the eDDA instruction (Inward eDDA instruction). Go to "Cash Management" > "FPS Service" > "Inward eDDA Request".
eDDA Registration or Inward eDDA Request
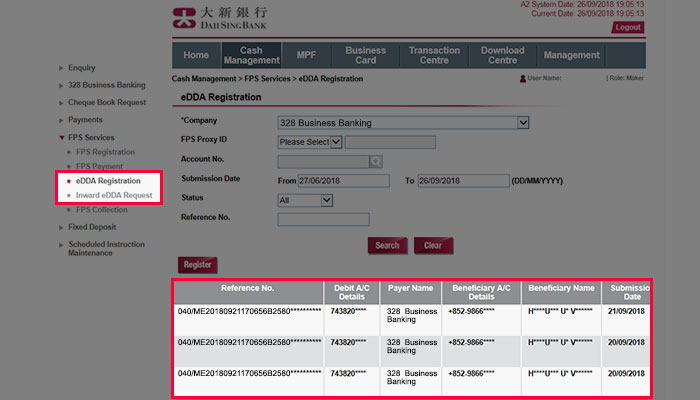
Check the detail for the below eDDA instruction (Outward eDDA instruction). Go to "Cash Management" > "FPS Service" > "eDDA Registration".
eDDA Registration or Inward eDDA Request
Check the detail for the below eDDA instruction (Outward eDDA instruction). Go to "Cash Management" > "FPS Service" > "eDDA Registration".
eDDA Registration or Inward eDDA Request
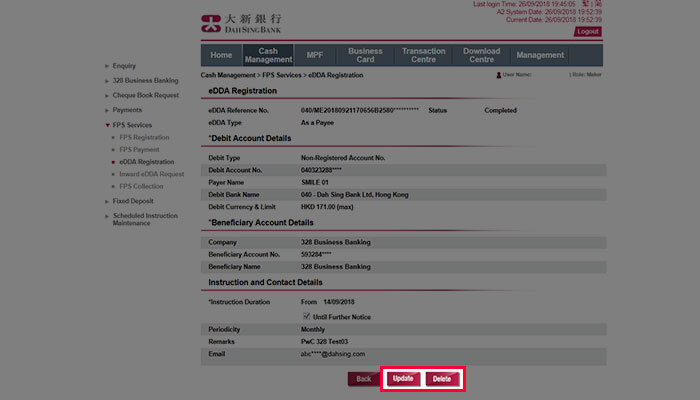
If you would like to view your inward eDDA instruction, please select "Cash Management" > "FPS Service" > "Inward eDDA Request" and click to view your designated instruction.
eDDA Registration or Inward eDDA Request
If you would like to view your inward eDDA instruction, please select "Cash Management" > "FPS Service" > "Inward eDDA Request" and click to view your designated instruction.
FPS Collection
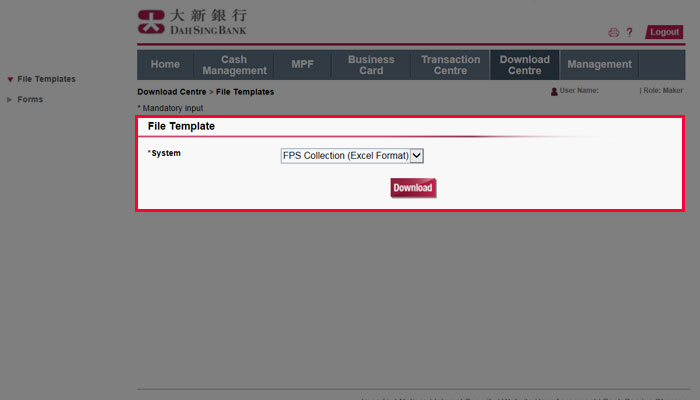
Download the FPS Collection file template from "Download Centre".
FPS Collection
Download the FPS Collection file template from "Download Centre".
FPS Collection
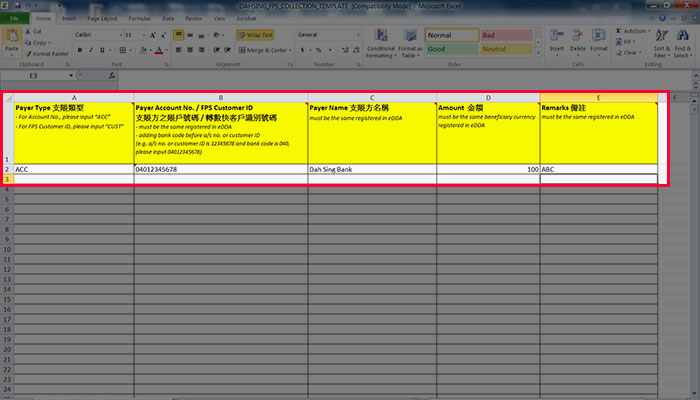
Enter the payer details in the downloaded file. All the details enter to the file must be the same as the payer details registered in the eDDA instruction.
FPS Collection
Enter the payer details in the downloaded file. All the details enter to the file must be the same as the payer details registered in the eDDA instruction.
FPS Collection
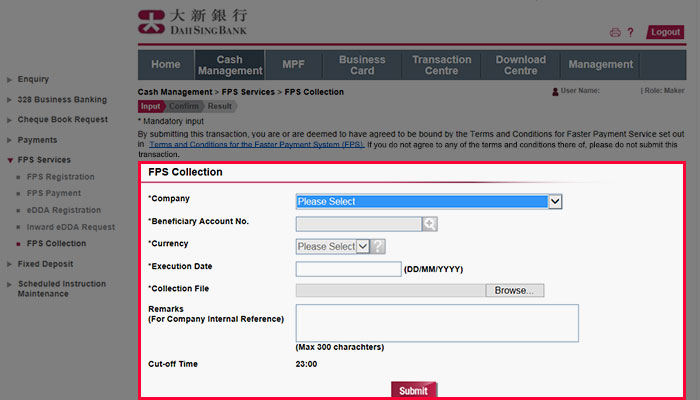
Select "Cash Management" > "FPS Service" > "FPS Collection". Then enter the instruction details, upload the completed FPS Collection file and then submit the instruction.
FPS Collection
Select "Cash Management" > "FPS Service" > "FPS Collection". Then enter the instruction details, upload the completed FPS Collection file and then submit the instruction.
FPS Collection
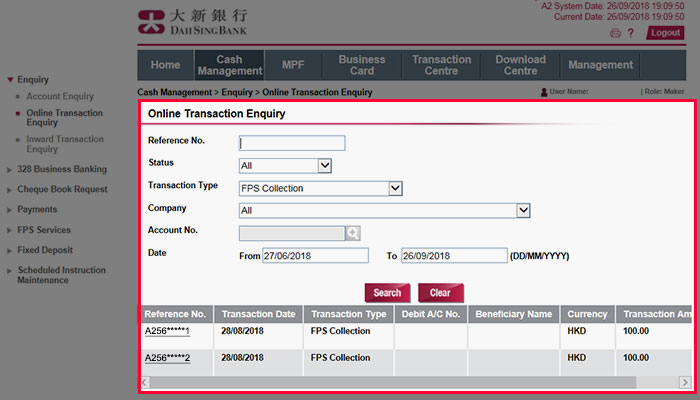
Check the transaction detail of FPS Collection on "Online Transaction Enquiry".
FPS Collection
Check the transaction detail of FPS Collection on "Online Transaction Enquiry".
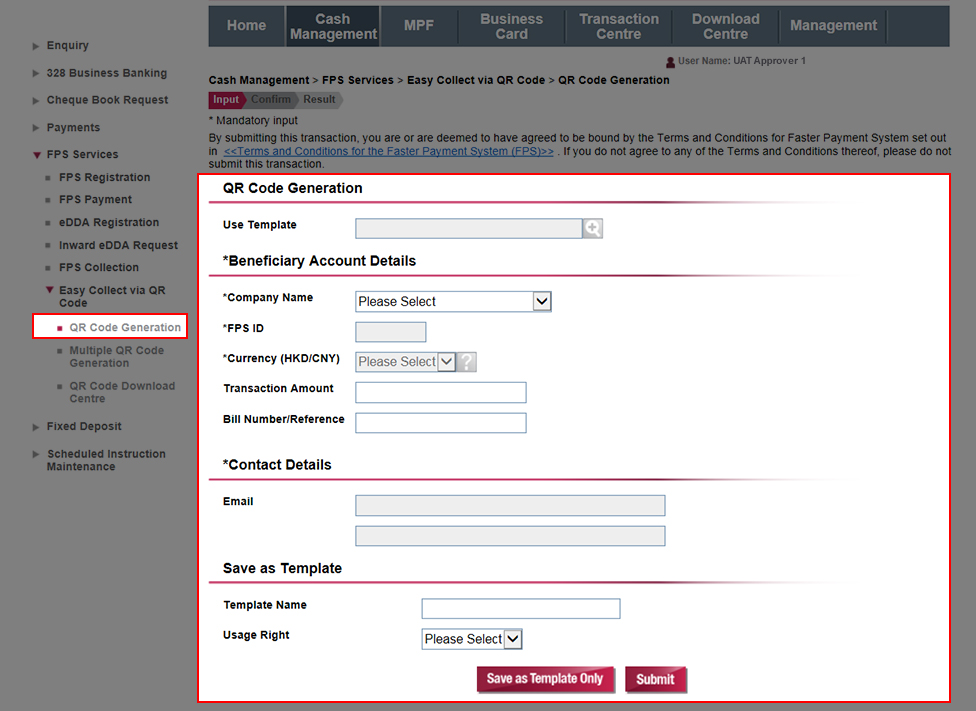
Easy Collect via QR Code
To generate individual QR code for receiving funds:
1. Go to "Cash Management" > "FPS Services" > "Easy Collect via QR Code" > "QR Code Generation"
2. Enter the beneficiary account details, currency and other information
3. Verify the information and submit the instruction.
(Multiple QR Code generation is only applicable to "Merchant Customer")
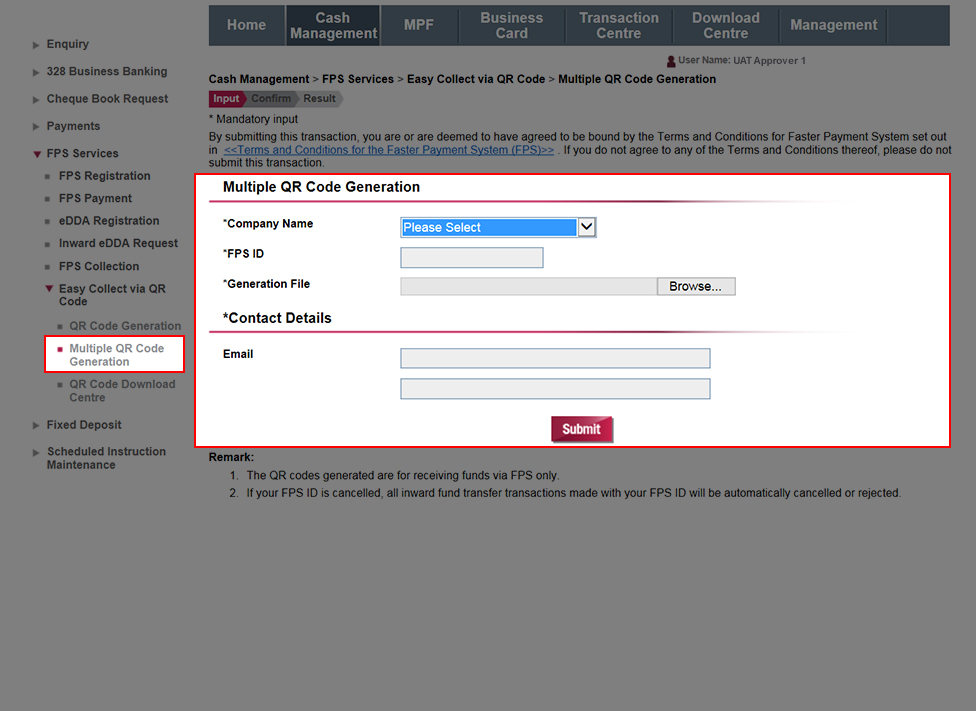
Easy Collect via QR Code
To generate multiple QR codes for receiving funds:
1. Go to "Cash Management">"FPS Services">"Easy Collect via QR Code">"Multiple QR Code Generation"
2. Enter the beneficiary account details, currency and other informationbr /> 3. Upload the data file*
4. Verify the information and submit the instruction
*The file template for Multiple QR Code Generation can be downloaded from the "Download Centre".
(Multiple QR Code generation is only applicable to "Merchant Customer")
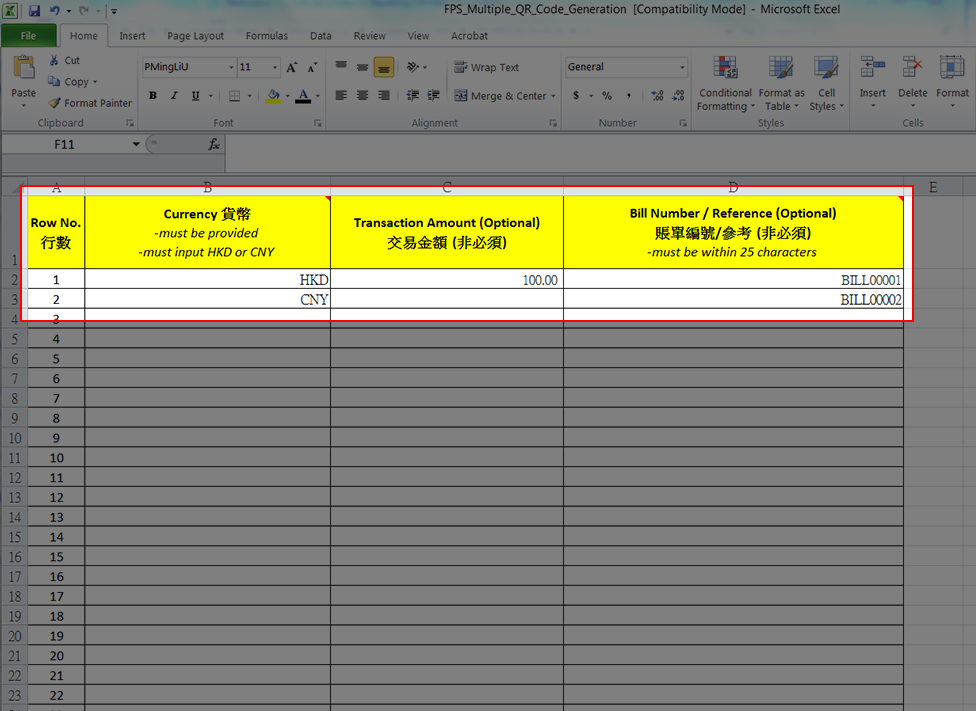
Easy Collect via QR Code
Enter a currency in the file template for Multiple QR Code Generation. You can also enter the transaction amount and/or bill number / reference for QR code.
(Multiple QR Code generation is only applicable to "Merchant Customer")
Easy Collect via QR Code
Enter a currency in the file template for Multiple QR Code Generation. You can also enter the transaction amount and/or bill number / reference for QR code.
(Multiple QR Code generation is only applicable to "Merchant Customer")
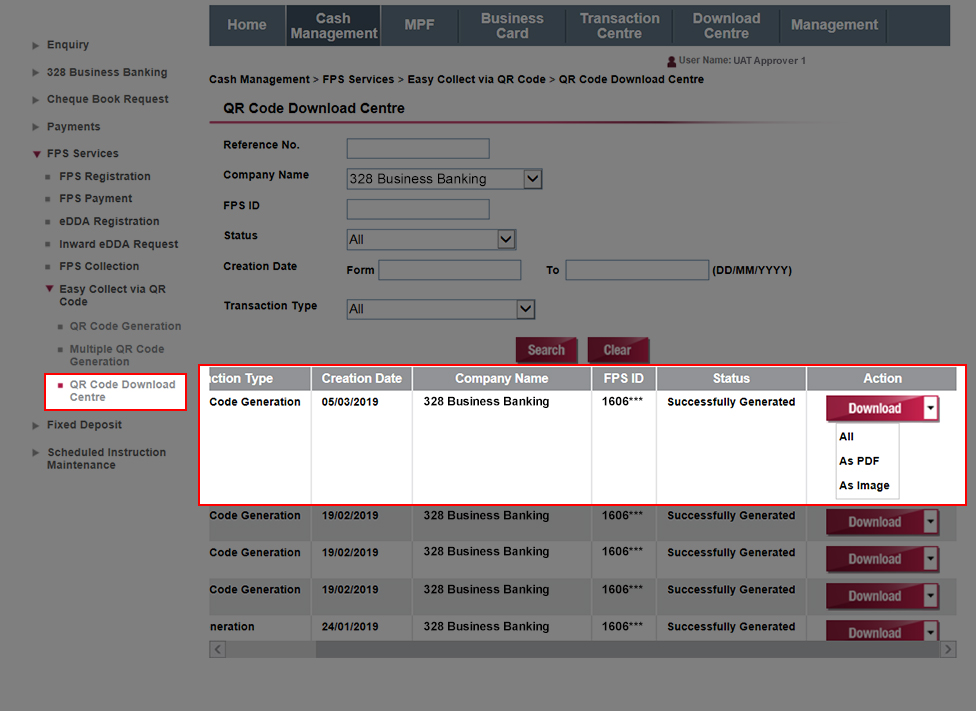
Easy Collect via QR Code
Once the QR code has been successfully generated, you can view and download the QR code in PDF and / or image format from the "QR Code Download Centre". If multiple QR code generation failed, you can query the reason from the "QR Code Download Centre" for further action: Data Validation Failed: Click "View" to view the reason to fail the QR code generation System Generation Failed: Click "Re-generate" to re-process the uploaded file and generate the corresponding QR code
(Multiple QR Code generation is only applicable to "Merchant Customer")
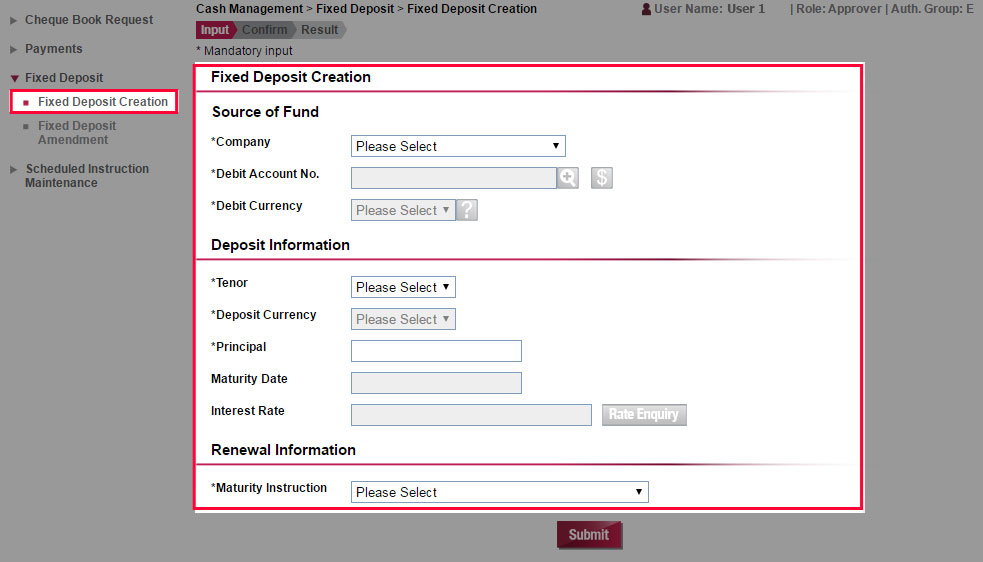
Fixed Deposit Creation
Choose "Fixed Deposit Placement". Enter the Principal Amount, select the deposit period and debit account. You can set up instant or scheduled instruction for placing fixed deposit. Click "Submit" to proceed.
Fixed Deposit Creation
Choose "Fixed Deposit Placement". Enter the Principal Amount, select the deposit period and debit account. You can set up instant or scheduled instruction for placing fixed deposit. Click "Submit" to proceed.
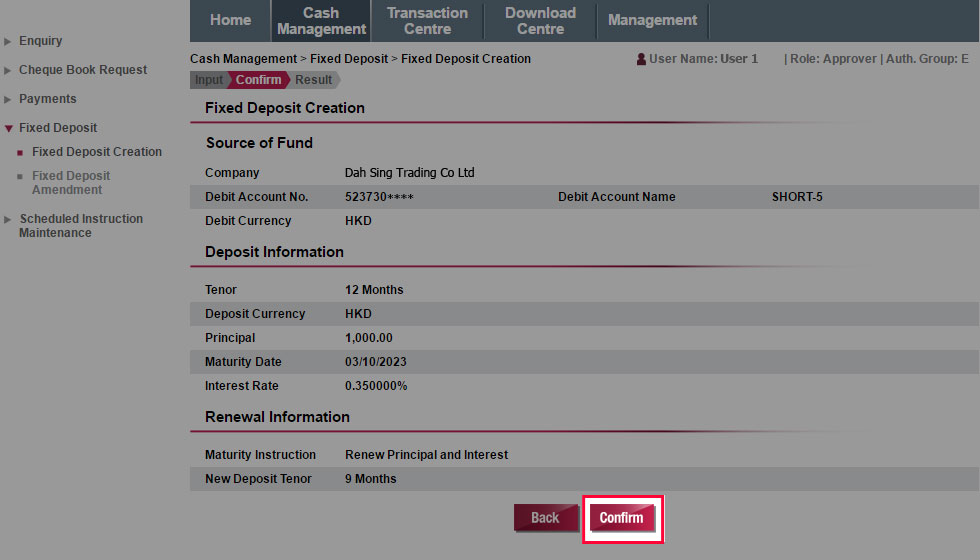
Fixed Deposit Creation
Verify the fixed deposit information and then submit the instruction by clicking"Confirm".
Fixed Deposit Creation
Verify the fixed deposit information and then submit the instruction by clicking"Confirm".
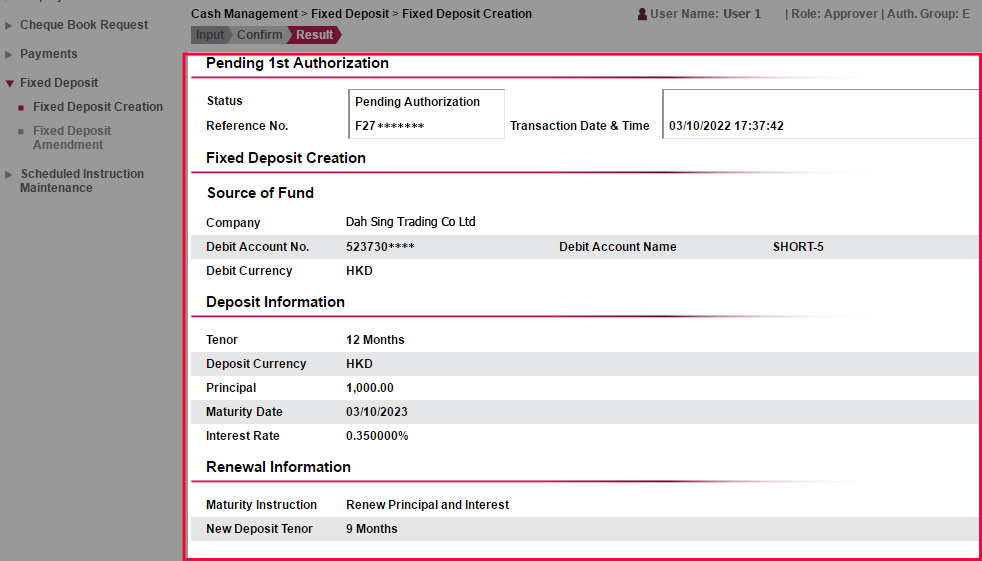
Fixed Deposit Creation
The instruction has been submitted successfully.
Fixed Deposit Creation
The instruction has been submitted successfully.
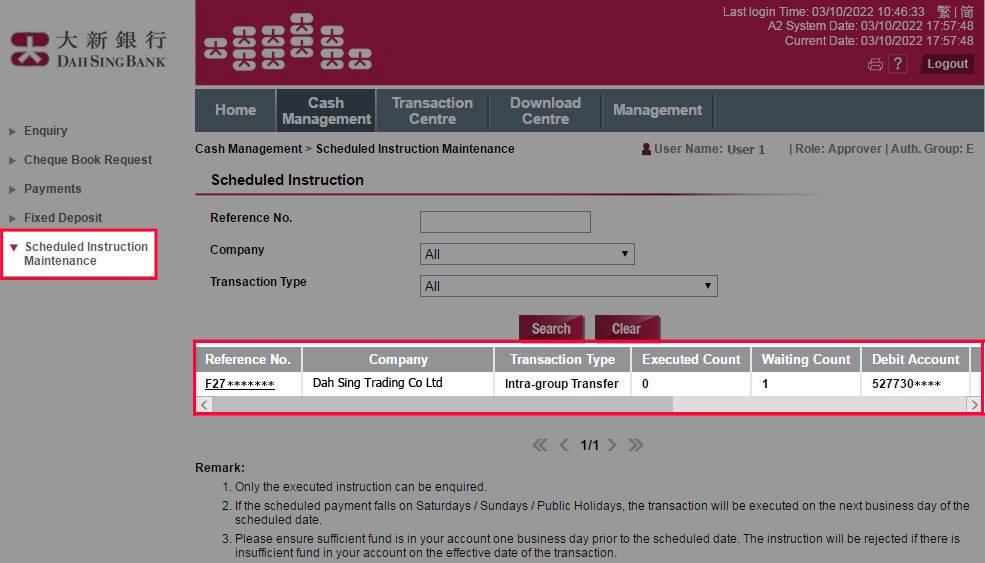
Scheduled Instruction Maintenance
Select "Scheduled Instruction Maintenance". You can select a Scheduled Instruction for amendment.
Scheduled Instruction Maintenance
Select "Scheduled Instruction Maintenance". You can select a Scheduled Instruction for amendment.
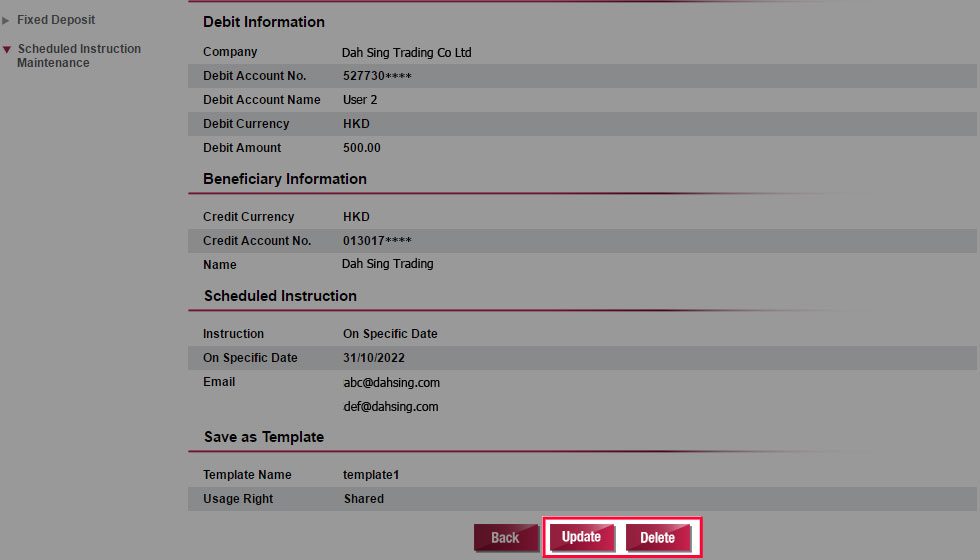
Scheduled Instruction Maintenance
You can click "Update" to update the scheduled date or click "Delete" to delete the selected scheduled instruction.
Scheduled Instruction Maintenance
You can click "Update" to update the scheduled date or click "Delete" to delete the selected scheduled instruction.
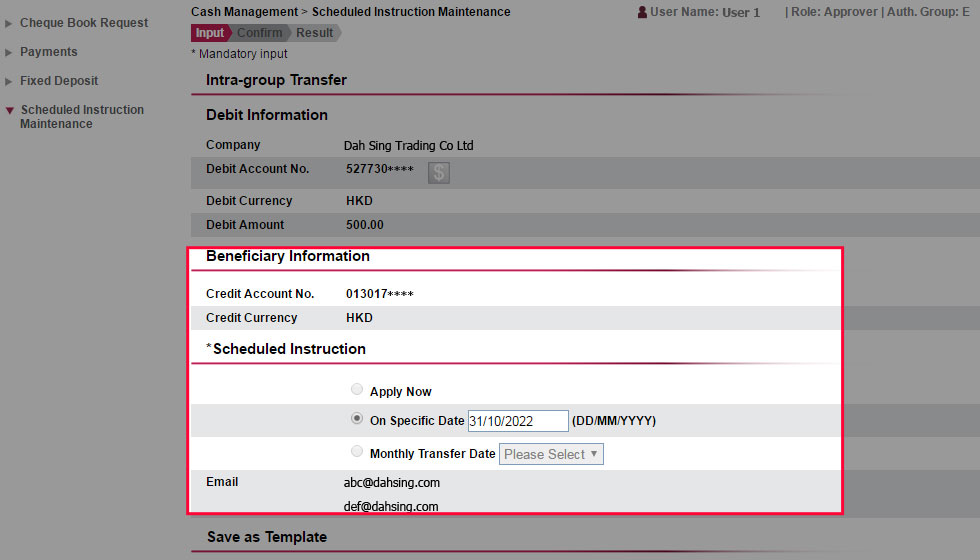
Scheduled Instruction Maintenance
Enter the updated transaction date. Then click "Submit" to proceed.
Scheduled Instruction Maintenance
Enter the updated transaction date. Then click "Submit" to proceed.
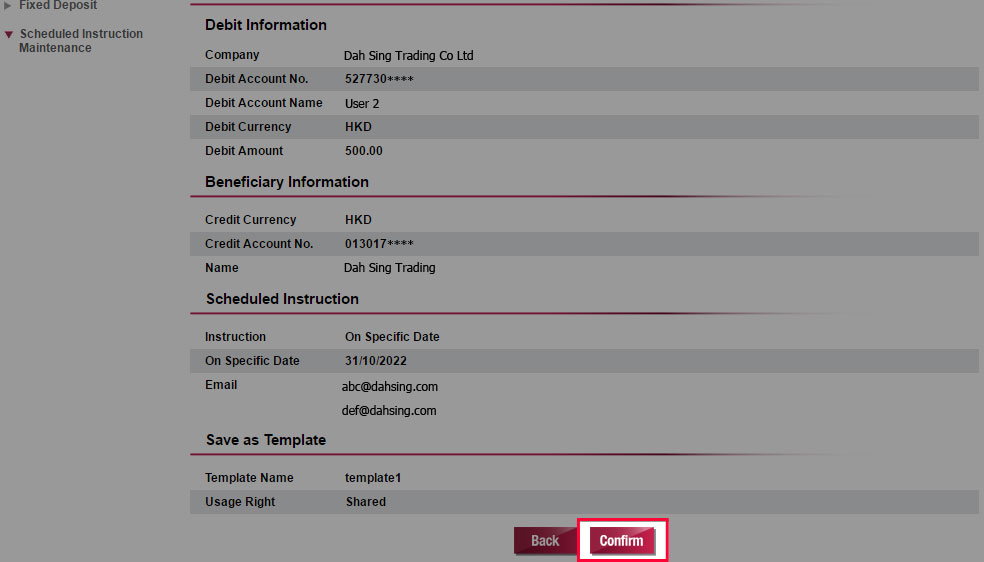
Scheduled Instruction Maintenance
Verify and then submit the updated or to be deleted instruction by clicking "Confirm".
Scheduled Instruction Maintenance
Verify and then submit the updated or to be deleted instruction by clicking "Confirm".
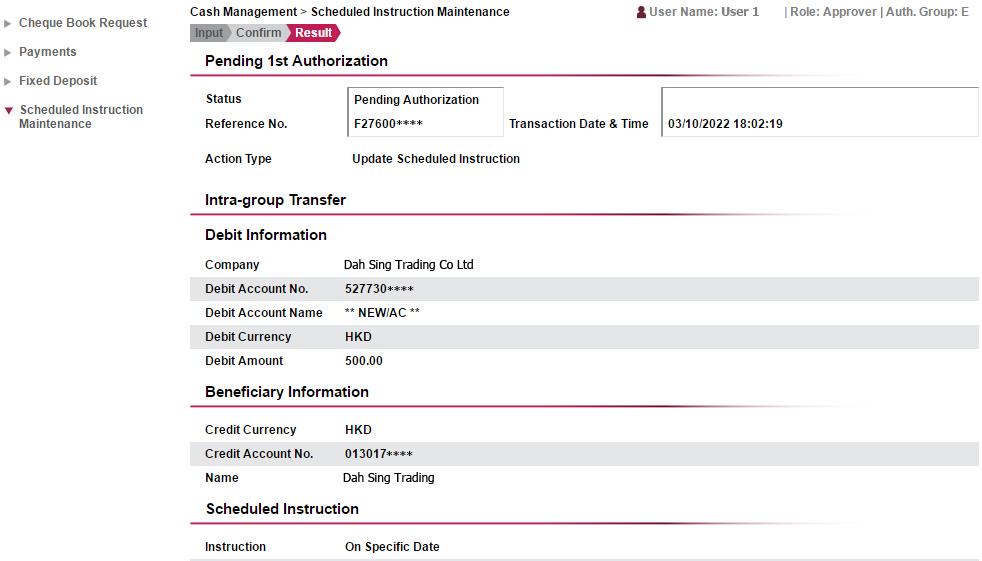
Scheduled Instruction Maintenance
The update or deletion of the scheduled instruction has been submitted successfully and will be processed upon final approval by the Approver.
Scheduled Instruction Maintenance
The update or deletion of the scheduled instruction has been submitted successfully and will be processed upon final approval by the Approver.
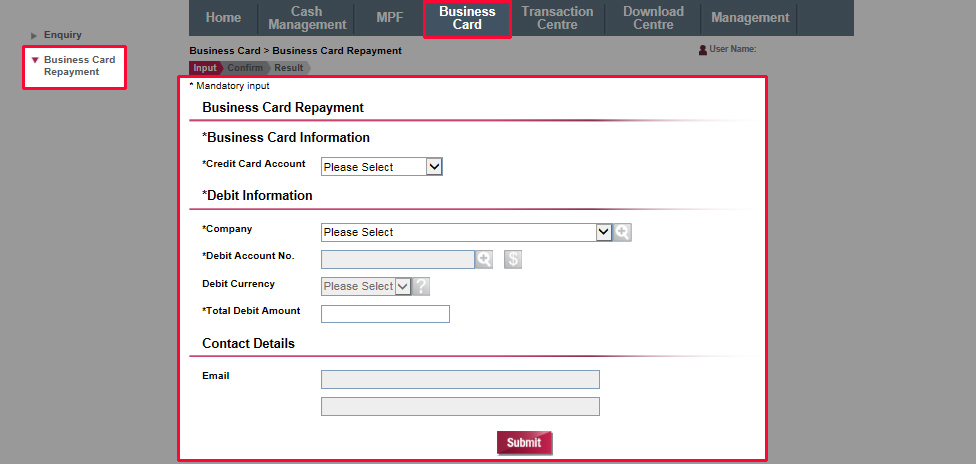
Business Card Repayment
Select "Business Card" > "Business Card Repayment". Select the business card and debit account, input the amount and other information.
Business Card Repayment
Select "Business Card" > "Business Card Repayment". Select the business card and debit account, input the amount and other information.
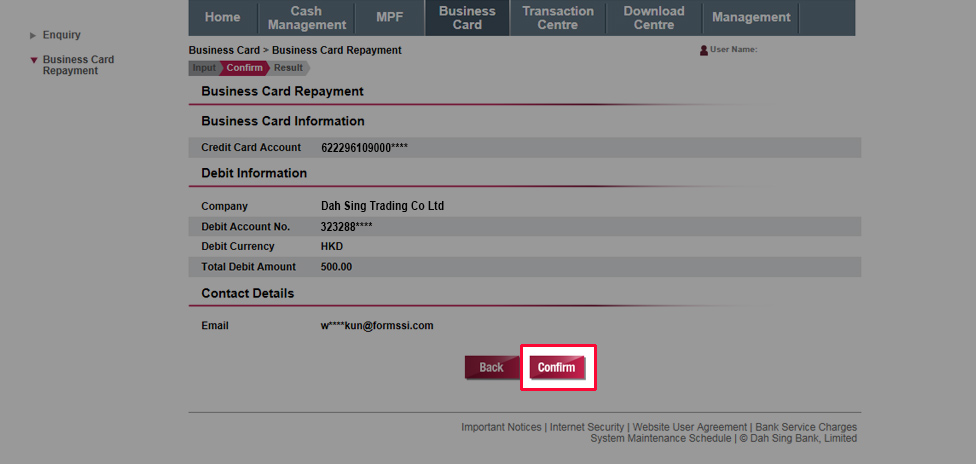
Business Card Repayment
Verify the information and then submit the instruction by clicking "Confirm".
Business Card Repayment
Verify the information and then submit the instruction by clicking "Confirm".
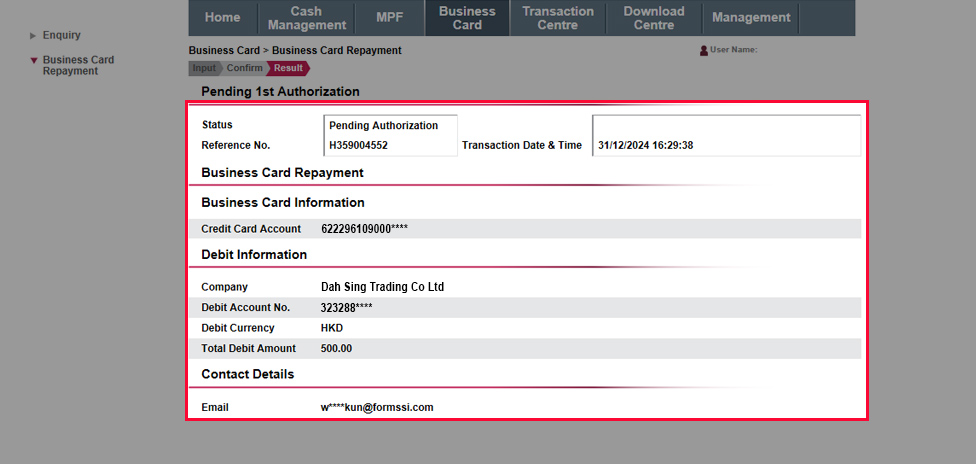
Business Card Repayment
The instruction has been submitted successfully and will be processed upon final approval by the Approver.
Business Card Repayment
The instruction has been submitted successfully and will be processed upon final approval by the Approver.
For 328 Business Mobile Banking Demo, please click here.
